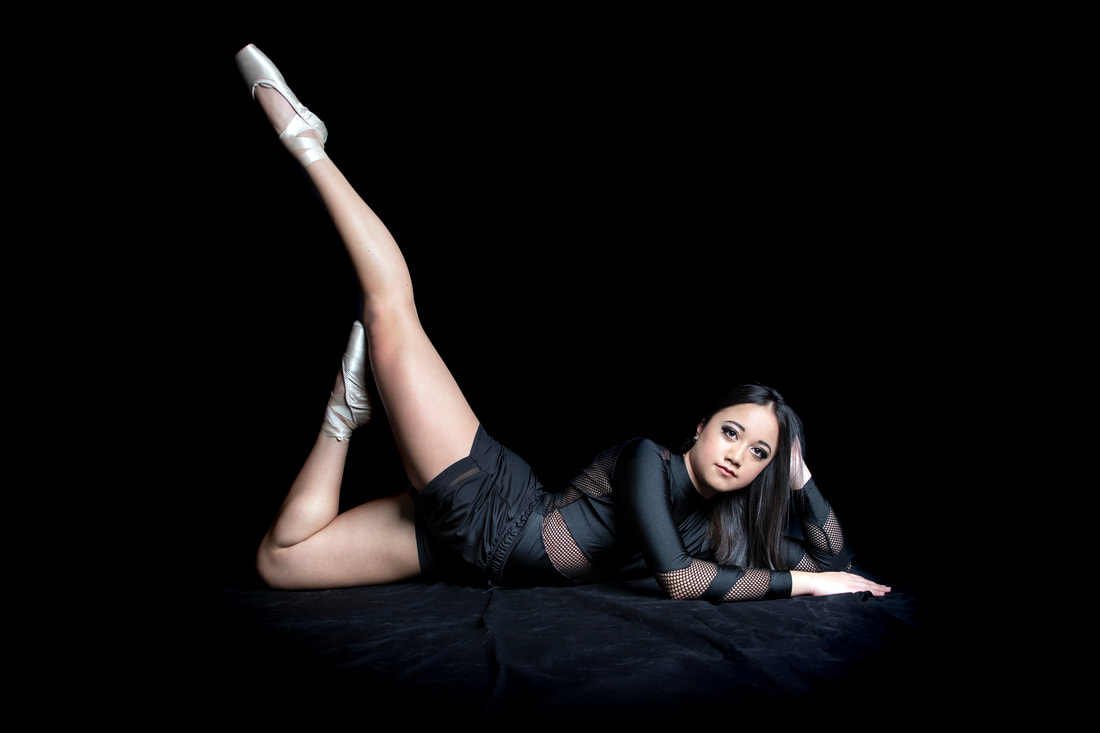
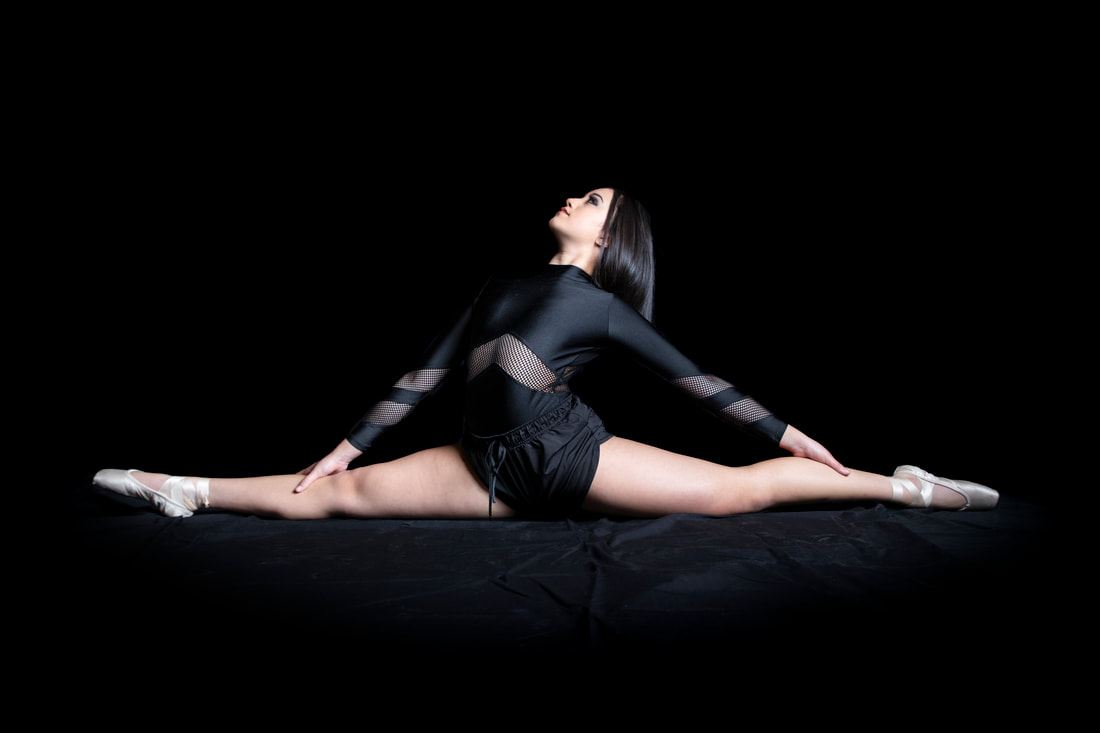
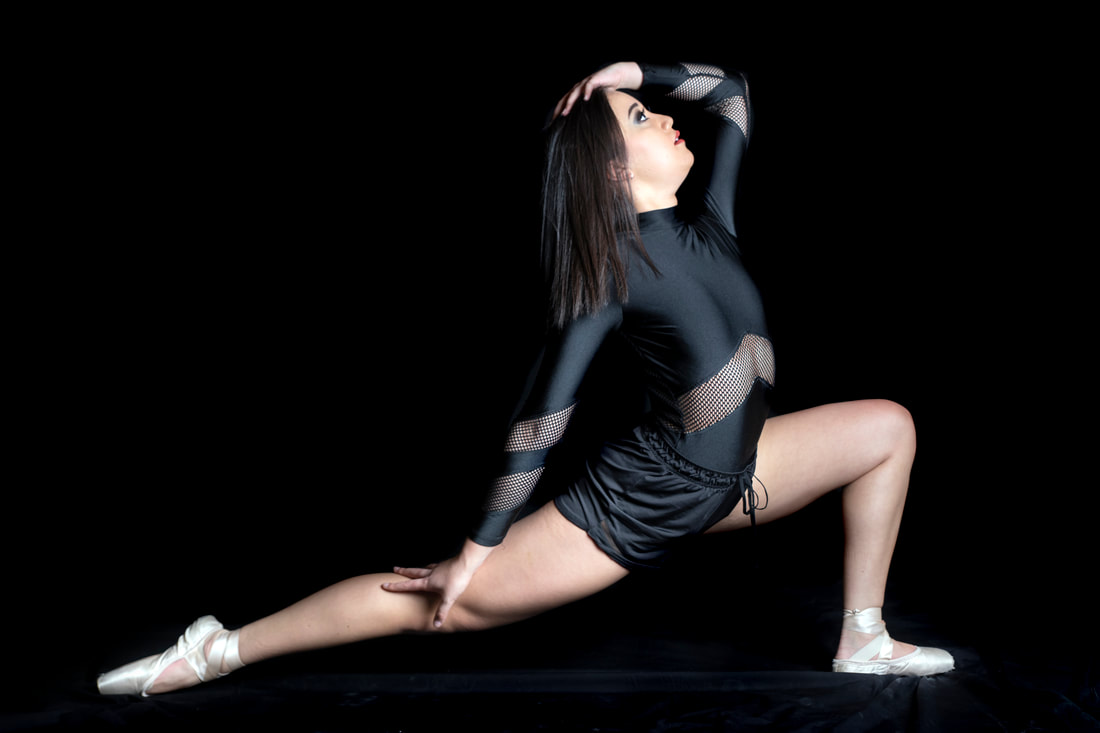
 Whenever I have a bad day or simply want a bit of an escape, I will spend time reviewing photos of photographers I follow or I will peruse some of my own images with an eye towards editing them differently. I have noticed that the subject of my images changes over time; specifically from working with models to not working with models. Truth be told, sometimes I need a break from working with models. Although it is exhilarating to work with models and like-minded creative individuals, it can also be very draining. Don’t get me wrong, I love working with models but there are simply times I need to seclude myself in my own photography. When I look over my work as a whole to date, I can quickly spot the times I needed a break from people pics. It’s no secret that I am an introvert and get energy from time spent alone and my photography appears to follows suit! Towards the end of this past summer, I was embroiled in photographing and editing images for a pinup calendar. Once everything was, for the most part finished, I immediately shifted to still life and other creative photography ideas that did not involve a model - AND IT WAS REFRESHING! Another benefit of not working with a model is that my shoot schedule is dependent on no one other than myself. I don’t have to check with someone to see when they are available and I definitely don’t have to worry about last minute cancellations. If I want to set up my camera at 11:30 on a Saturday night for some macro images, I can…and do!  Eventually however, I feel the urge to get back to creative ideas with models. After about a month of time away from models following the calendar idea, I scheduled a shoot with an amazing competitive dancer, Sasha, for some really awesome images. Oddly enough, it was another model that connected us together! Other than the nerves that come with any photo shoot with a model, I loved getting another human being back in front of my lens! As I have mentioned before, I rather enjoy the fact that my photography is all over the map from macro to abstract to astrophotography to portraits to everything in-between. Despite the fact that I find times I need a break from people pics, I have yet to discover a period of time I needed a break from photography in general. Hope that never changes. So if you ever find yourself becoming drained shooting the same types of subjects over and over, take a break! It's not only necessary but will probably advance your skills when you do return to the genre!
0 Comments
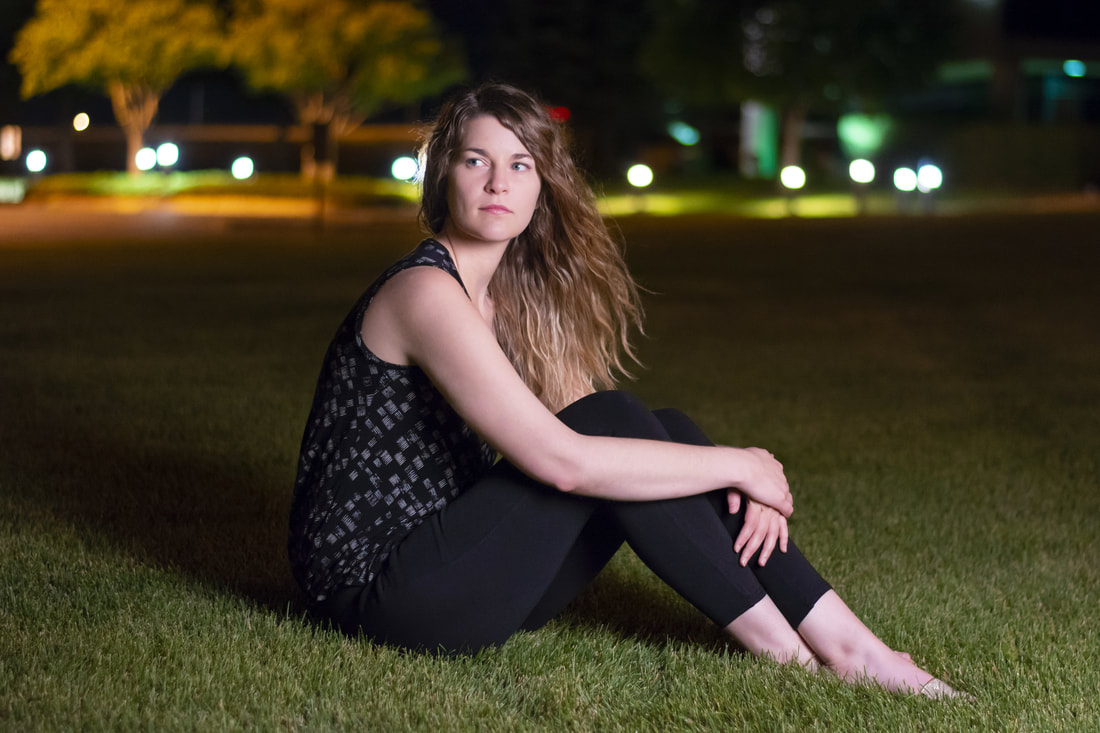 I recently wrote an article about night time portrait photography with, and without, a flash. Since that shoot, I have returned to the idea and have some updates and suggestions that might be helpful for those struggling with this technique, as I have. I generally scout out locations for shoots but this is especially important for night time portraiture as you need to know ahead of time where to find nice lights for the background. Instead of returning to the location I used previously, I looked around my neighborhood and found a few decent spots. I ran across an incredibly awesome location but was asked by security to leave the property AND delete all my photos of the building (we’ll discuss your rights as a photographer in an upcoming post as I found his request both amusing and infuriating). After location scouting, all I needed was a model. Mattie was the first model that came to mind for this idea. Mattie has a very elegant and classic, girl-next-door, type of beauty that works perfect for portraits, IMHO. After pestering her to help me out, she agreed. Click on an image for a larger view. 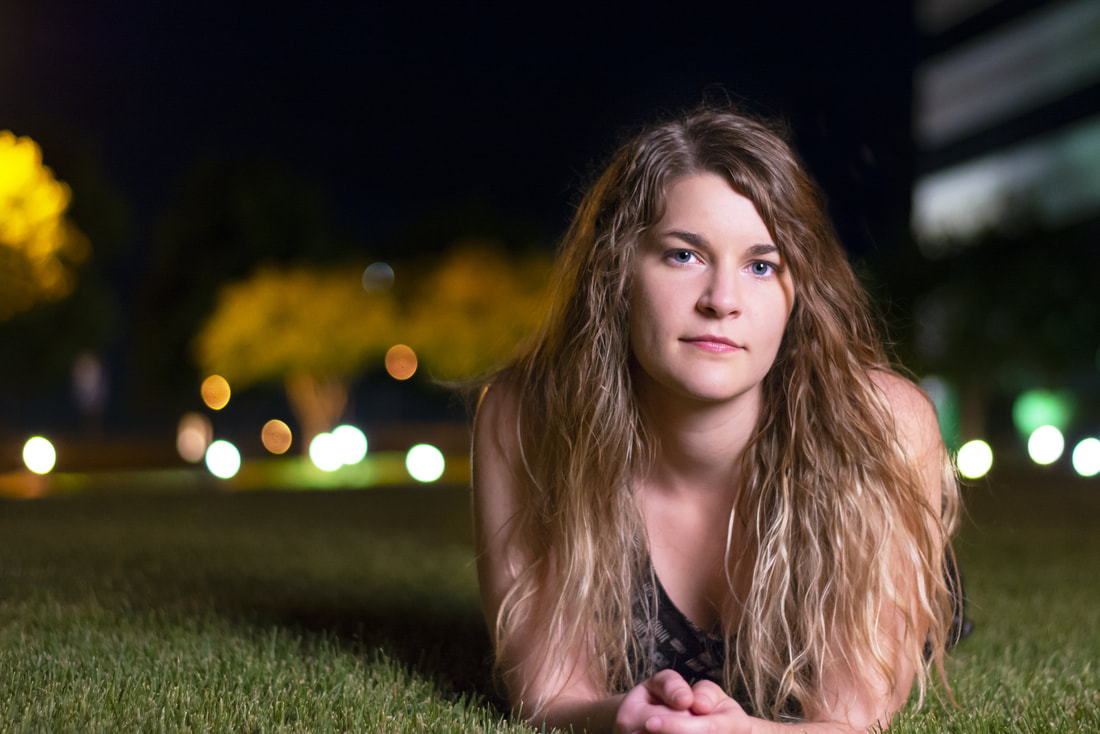 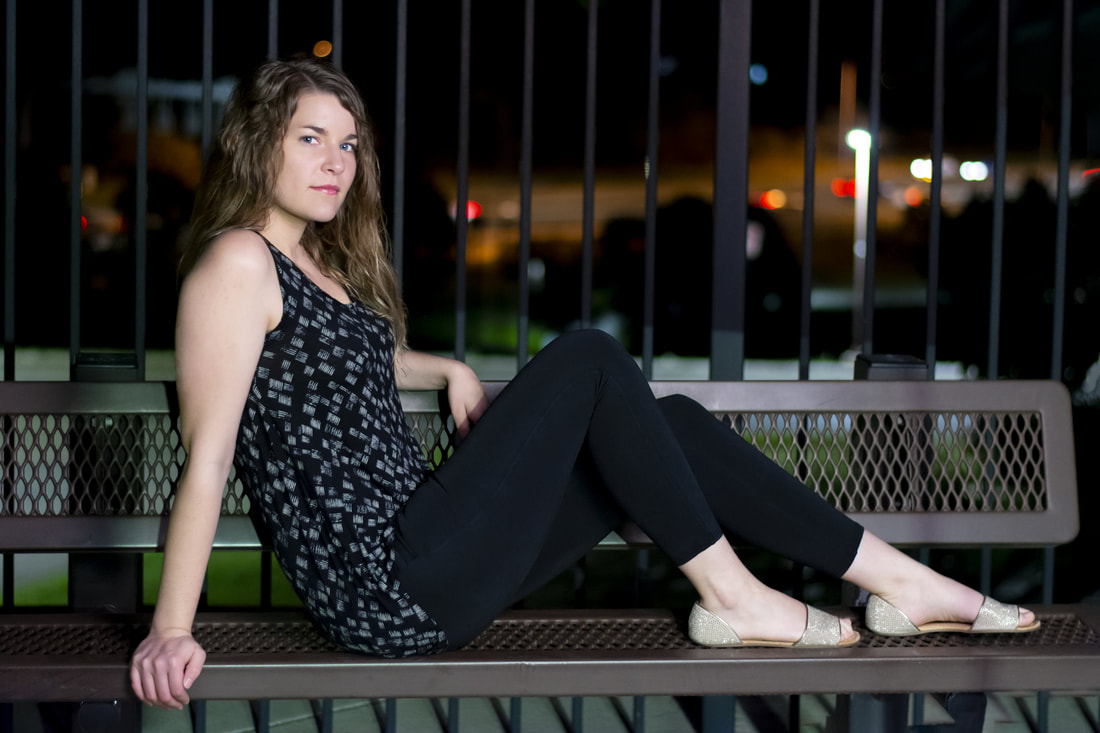  And on a side note – I’m willing to bet Mattie doesn’t realize her own beauty. I find that most people and models don’t. We are all so quick to focus in on our own flaws and imperfections that we rarely take the time to look beyond our self-critical glasses and really appreciate ourselves, myself included. And yes, you can realize your own beauty without being vain or overly confident. I know for a fact that I have never taken a picture of someone that isn’t beautiful but I’m also willing to bet most, if not all of the people I have photographed would disagree with that statement when looking at images of themselves. So incredibly sad. Celebrate your beauty! 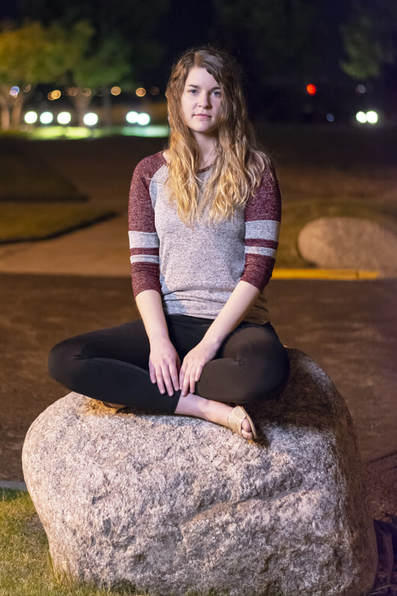 Anyway, for this second round of night time portrait photography, I changed my approach a bit. With the prior shoot, I was simply trying to get night time portraits with mainly available ambient light. Only on an occasion did I resort to a flash when the surrounding light just wasn’t bright enough. This time around, I exposed specifically for a dark background and the background lights first, and then used a speedlight with a relatively large softbox to illuminate the model for every shot. I did not rely on ambient light to light my model at all. If your try this method at night, you will quickly learn that the overall color of the light at night is much warmer (oranger, if that makes sense) than the light you get from your flash which can appear quite cold (bluer). This is something I discovered on my first shoot. To correct this problem for this shoot, I used an orange gel (CTO) to help balance the color temperatures. It worked great! For a few of the shots, I probably could have used a stronger gel or maybe even two gels to get the look I was after. 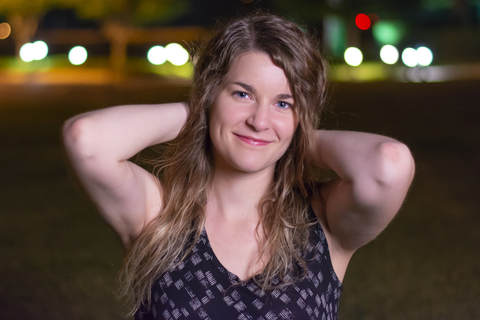 Much like my original outing, I wanted to get a decent amount of bokeh from the background lights so I shot as wide open as I could. I used mainly two different lenses (50mm f/1.8 and the 24-70mm f/2.8) for the shoot. Shooting this wide open aids the camera collecting light from lights in the scene. It also helps create amazing bokeh but with one significant drawback – speedlights produce a lot of light, even on the lowest power setting. There were several times I needed to move the softbox further back to reduce its power. Even on its lowest setting inside of the softbox with two layers of internal diffusers, the flash was simply still too bright. In the future I will bring an additional diffuser I can place over the flash head to help reduce its power in addition. I did not want to raise my f stop and lose the bokehlicious background and my ISO was already at its lowest. The only option left was to move the light further from the subject (which in turn made it a harder light which I didn’t necessarily want either – just can’t win). We made a night of going from location to location – one of which was a parking lot outside of a police station. At one point, a police cruiser watched our activity for a bit but eventually tired of our antics and left. As always, Mattie brought several different outfits to keep the images looking fresh. I experimented as much as possible with different settings because this type of photography is not something I feel competent at…yet. Upon review of the images, some I liked and some not so much. But that’s okay! It just means I get to try it again and build on my experiences. I never tire of failing. It’s when I learn the most! 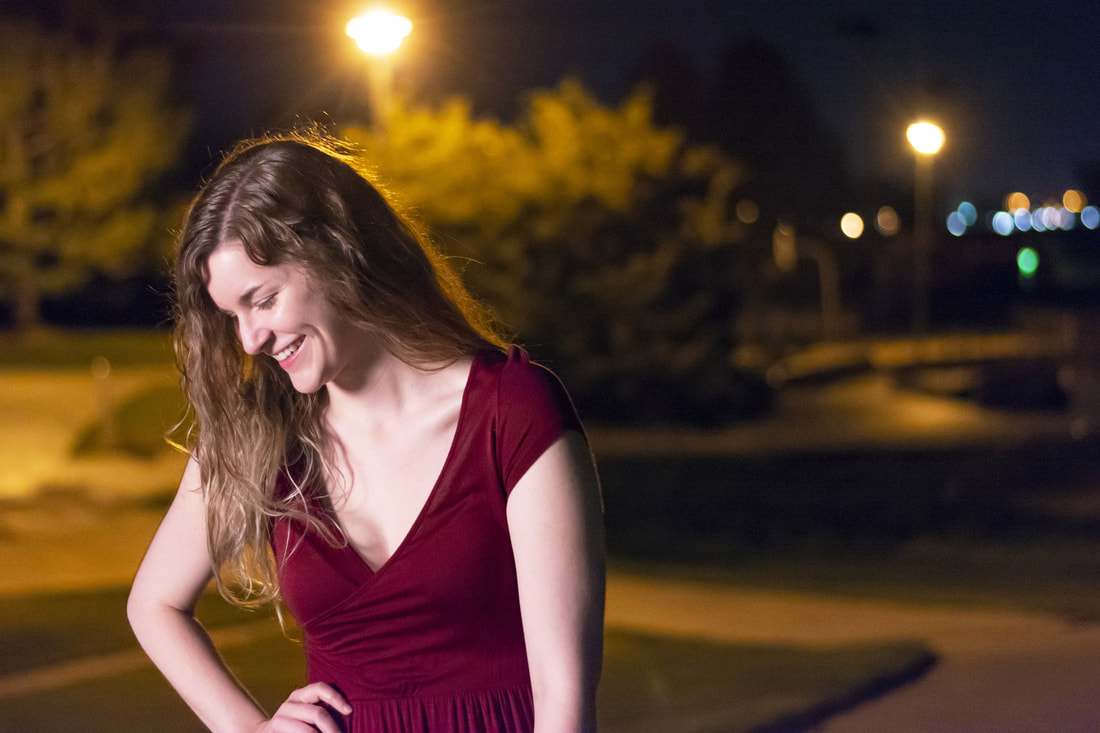 So as usual, pick up your gear, find an idea you’ve never done before, and go mess it up as best you can! Special thanks to Mattie for helping out when I’m sure she had a plethora of other more appealing options that Friday night. Much appreciated!
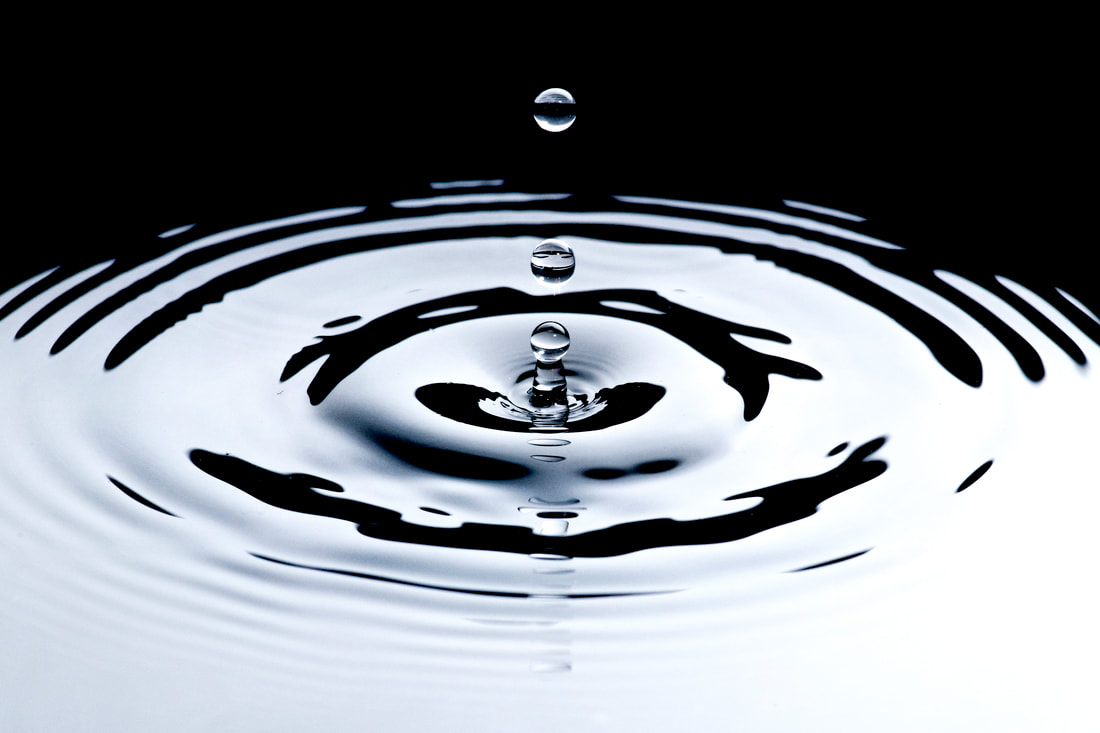
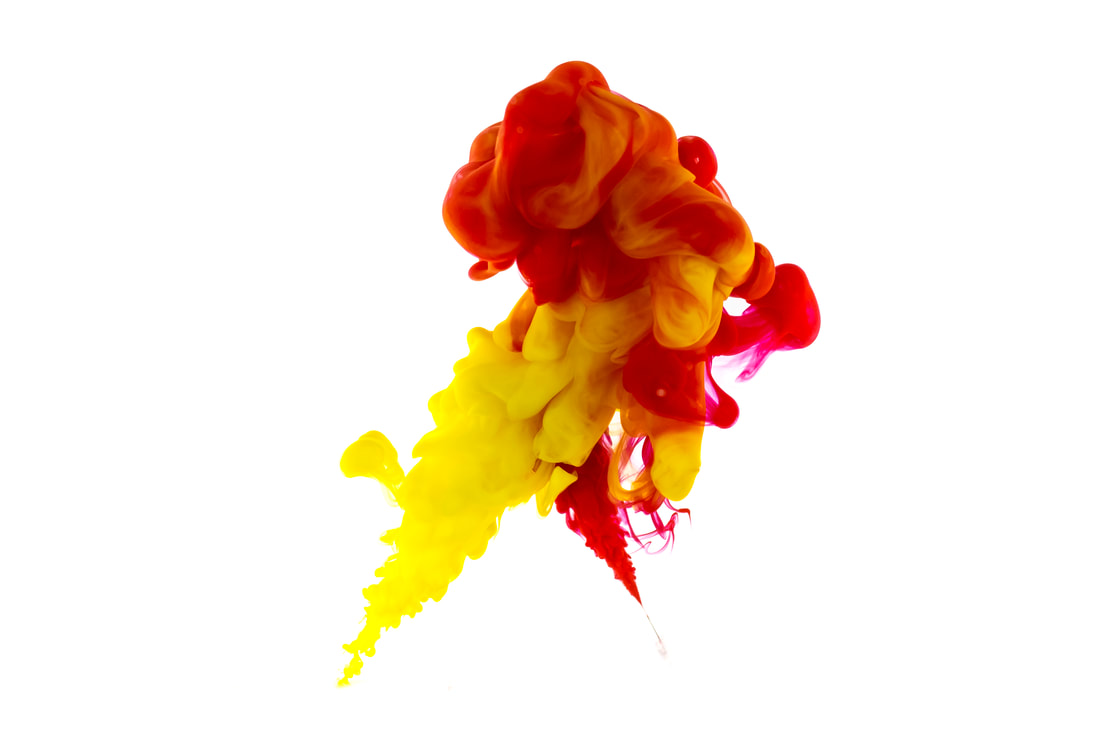
"Success does not consist in never making mistakes but in never making the same one a second time." ~ George Bernard Shaw I am far from where I want to be as a photographer and I have far more failures than successes when it comes to my work. But with each failure, comes an opportunity to learn and grow. Many photographers believe that you should only post the best of your best work online, especially if you are attempting to attract new potential customers and to some degree this is a sensible statement. However, my sites are geared towards sharing my experience as a photographer and to pass along knowledge that might help someone else. To that end, I have several images that taunt me EVERY SINGLE TIME I look at them. 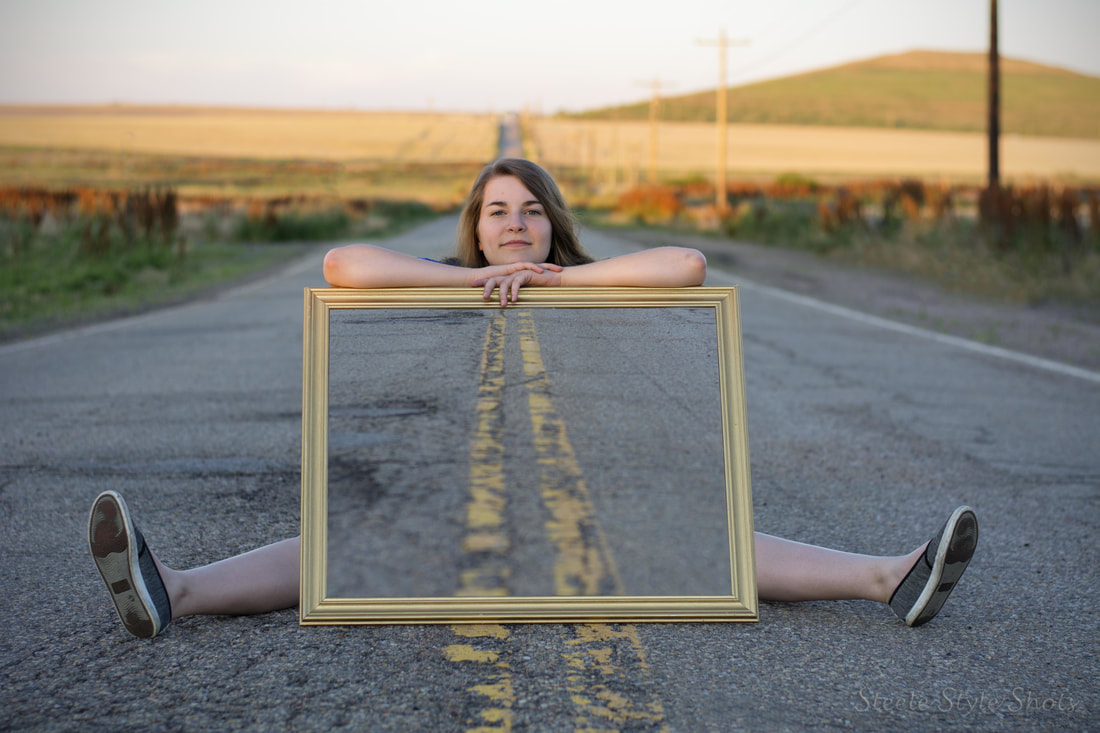 I both love and hate this image - beautiful model and creative idea, but poorly executed! The lesson I learned from this image is to slow down! To create this image, you set up a camera on a tripod and take two pictures of the same scene; one picture with the model and frame in the scene and a second picture without the model and frame. However, before you take that second picture, make sure you have switched your camera to manual focus!!! On my first shot, I focused on the model’s eyes (which is where you should focus for most images with people). Then I had the model move out of the scene and took a second shot of just the street. However, my focus point (which was on the eye previously) was now over a section of the road fairly far away. As any good automatic focusing system will do, the camera made sure that point was in focus – shifting focus back making the area where the model was sitting previously slightly out of focus. You can notice this by looking at the street inside the lower part of the frame. It is much more out of focus than the surrounding street outside of the frame. I didn’t catch this mistake until I got home and started to blend the images together. Once I noticed it, I knew exactly what I had done wrong and my heart nearly stopped. I honestly contemplated not posting the image at all. I have done this idea several times since and have corrected my mistake! 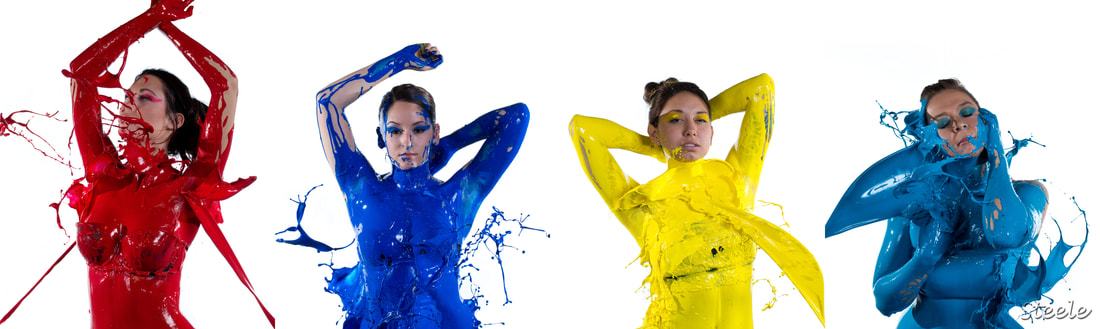 Oddly enough, as a colorblind individual I find colorful images very cool and as a result I love creating images with bright and bold colors. This paint toss shoot I did many years ago was my first attempt at such an idea. Although most people probably do not see anything technically wrong with the images, I DO! Again, it wasn’t until after I got home and reviewed the images that I discovered my error. All of the images were taken at ISO 1000! This may mean nothing to the average casual observer, but to pixel peepers like myself, I saw far more noise and grain in the images than I wanted, liked, or preferred. I’m not sure what I was taking pictures of prior to this shoot, but I forgot to reset my camera after that shoot (or before this one) to my base settings – which would have resulted in far less grain and image noise. I fixed the issue as much as I could in post processing but I prefer to get the image as near as perfect in camera. As a result of this error, I ROUTINELY reset my camera and check my settings before each and every shoot. 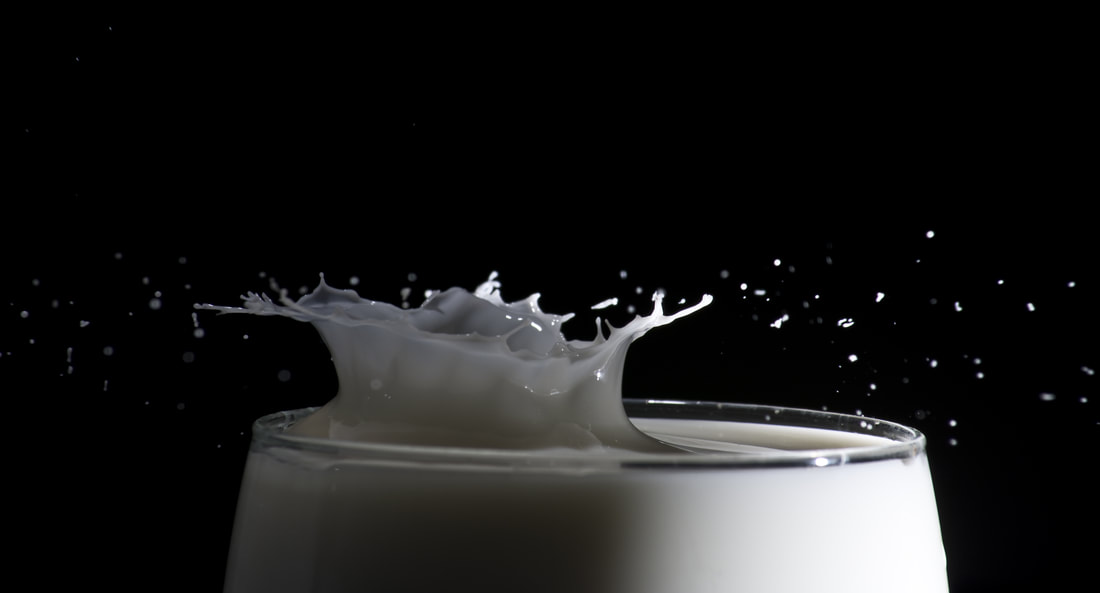 A lot of photographers make fun of those that ‘chimp’. Chimping is when you take a picture and review it on the back of the camera before taking the next picture. Because of this next mistake, I have no qualms with chimping and chimping the ENTIRE image. With this macro shot, I set everything up, had my camera on a tripod, and had two flashes on either side of the glass for lighting. I was so concerned with trying to capture the actual splash and milk drop that I neglected to look at the entire image as a whole. As a result, I missed the fact that I had forgotten to turn on the left hand side flash – evident in the final image. This error cannot be fixed in post processing. Again, not an error I think most would notice or ascertain from the final image, but I KNOW! I now review my entire image not only focusing on the subject of the shot, but the background, highlights, shadows, and just about anything and everything else. I will chimp all day long if it means getting the proper image. 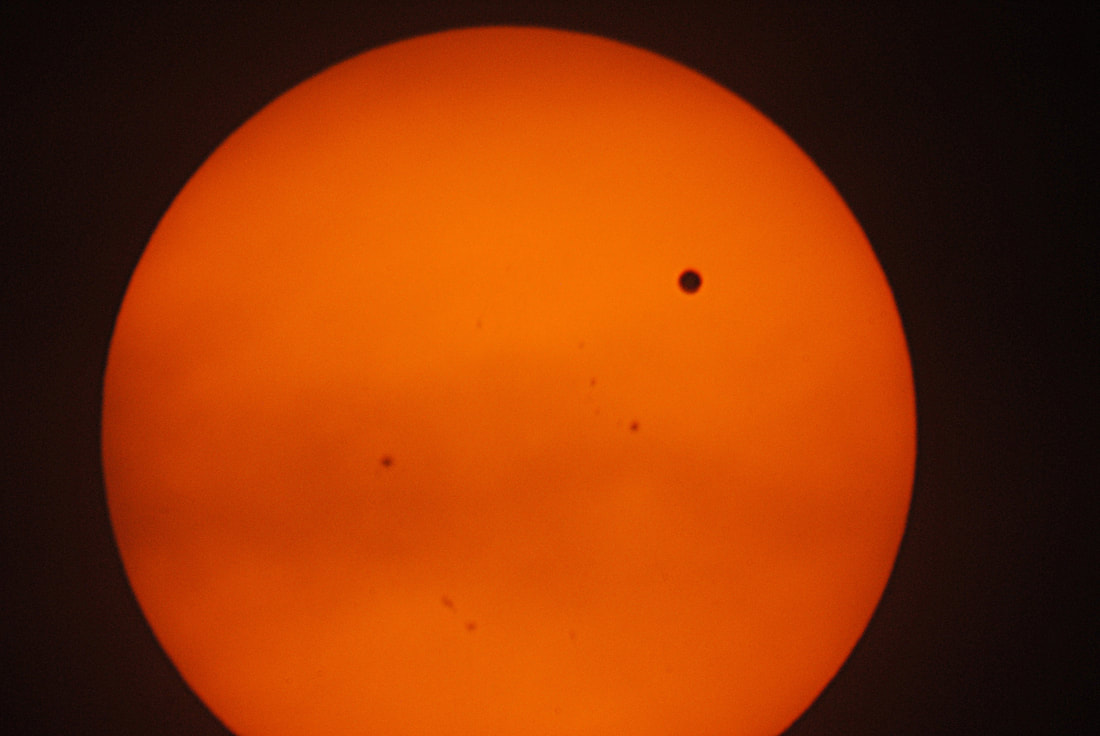 And perhaps my biggest mistake...the Venus transit. An event that will never happen again in my lifetime and I failed to preserve it the best I could. I spent months learning how to connect my camera to a telescope. I purchased special equipment to mount the camera, a solar film to cover the telescope, and I even purchased a barlow lens to magnify the image. What I failed to do, however, was learn how my camera worked. I got tons of images and was very pleased with them for several months until I learned what shooting in 'raw' meant. All of the images I took were simple jpgs. Again, probably not a big deal to most but I missed the opportunity to grab ALL of the digital data from the shots to be able to edit the images to their fullest. And although you can edit jpg images to some degree, it's no where close to what you can do with a raw image. Sad, sad moment... These are only a few of the images that remind me this hobby is a process and that I am far from immune to making mistakes. These images are also milepost markers as to where I have been and where I am today in regards to my changing skillsets. Although I wish every image I took was award-winning, I don’t get nearly as upset now when I have a failure or two (or several). It just means I get to try it over again and that means making more creative images! Win win! So if your images are falling short of your expectations or if you made a straight up mistake, the worst thing you can do is give up. Rather, try the idea over again and attempt to correct the issue. The more you do anything, the better you will get at it.
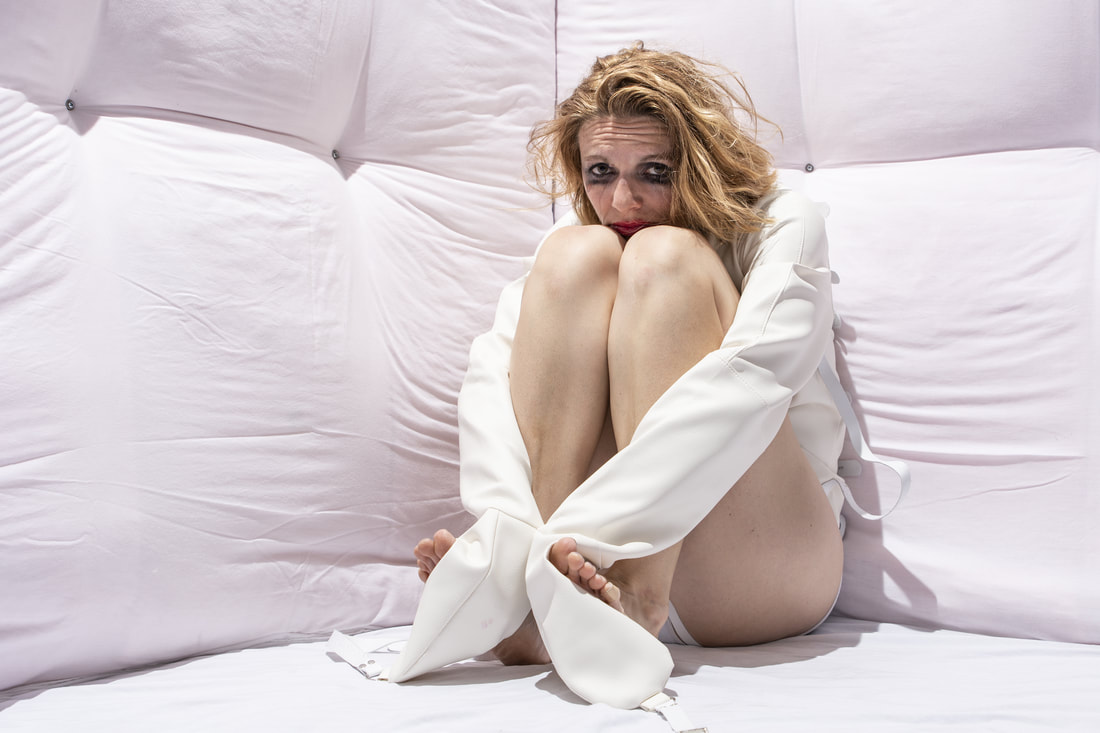
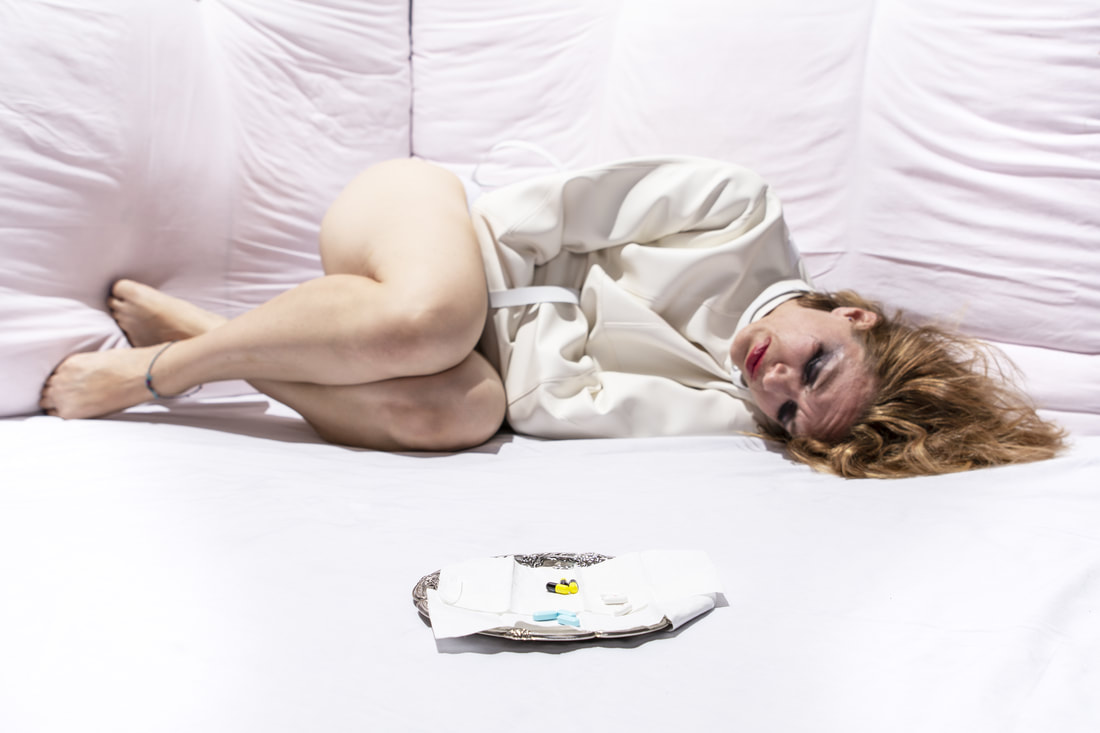
What could be more fun than putting a model into a straitjacket for a photo shoot? Nothing! Absolutely nothing! Can you sense I had fun with this idea? This idea was born about a year ago when I was trying to find a fun shoot ideas to do that I hadn’t seen replicated online a dozen or more times. Although coming up with a completely original idea for a shoot is nearly impossible, with a little digging around I discovered very few images related to my idea and even fewer videos. Woohoo! – made it over the first hurdle.
The second hurdle is finding a willing model. My good friend Alecia commented on a picture I posted that she wanted to do a themed shoot. Silly rabbit! She should know better than to tempt me. I contacted her and ran a few ideas I had in mind for shoots and we settled on the straitjacket idea (with a little persuasive begging from me). I knew the idea had the potential for varying degrees of emotional expression from the model. I also knew Alecia would be a perfect fit for this idea. She is an incredibly creative person herself and can get into character very easily and convincingly. Woohoo! - second hurdle down.
Click on thumbnail for larger image.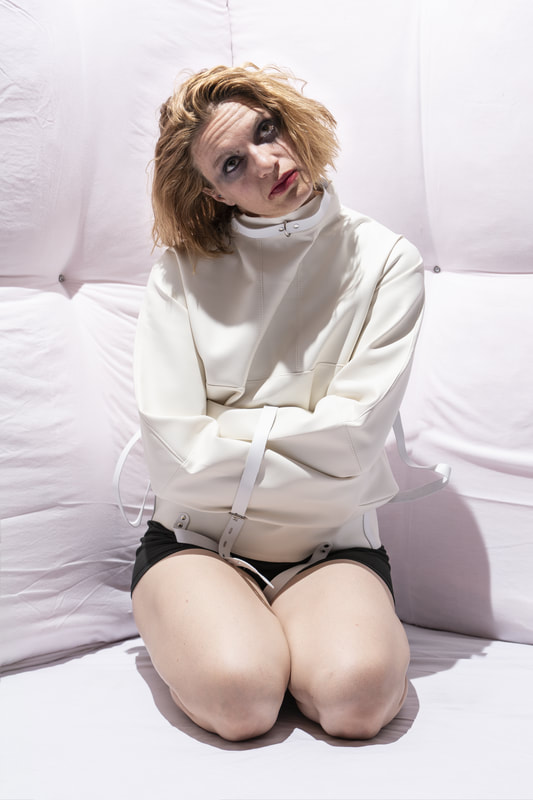
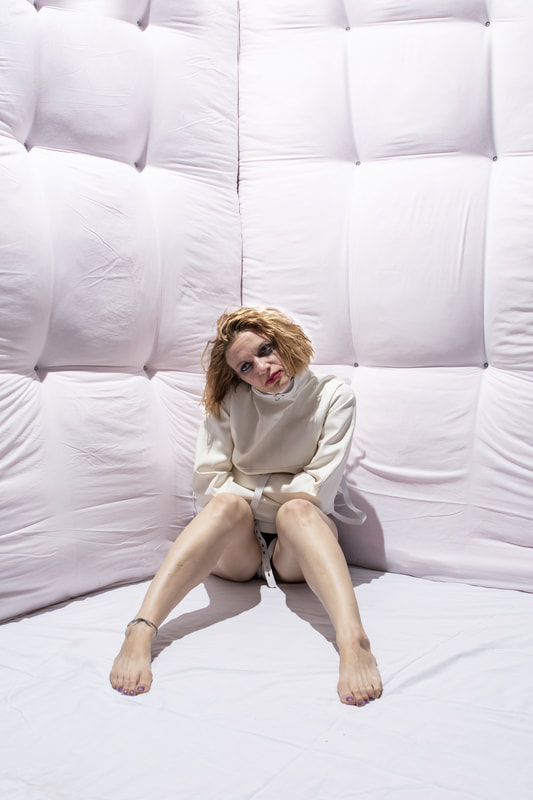
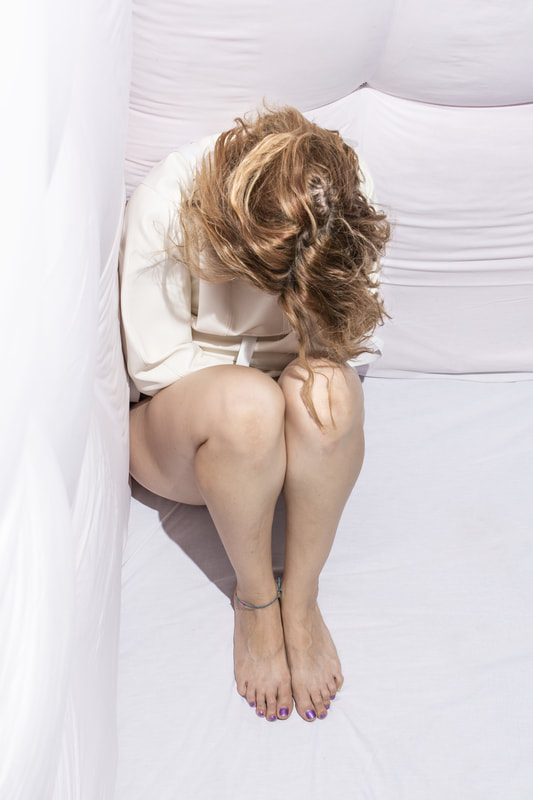
The third hurdle is finding appropriate costumes and props. A genuine straitjacket is prohibitively expensive to purchase for one simple photo shoot. I think the lowest priced genuine jacket was a little over $200. Plan B, take to social media and see if I can get lucky! Who knows, maybe one of my friends actually has one (…and as an aside, a friend of mine corrected my request on social media for a straight jacket. Indeed, it is spelled ‘straitjacket’ and is one word. Thank you Paul!) . No traction with plan B. Plan C, costume straitjacket. My go-to costume store didn’t carry anything close to resembling a straitjacket. Most of the costume straitjackets I saw online were so obviously ‘costumes’ that I didn’t think they would be very convincing. I did, however, find a decent looking jacket on Wish that turned out to be about as good as I was going to get for the price. Since I wanted the images to look realistic, I needed to either find or make a padded room. I decided to make a room, or at least a corner of a room.
For the construction of the room, I purchased two 4 feet by 8 feet composite boards and also purchased some wall insulation. After placing the insulation on the boards, I covered the insulation and boards with plain white king-size flat sheets for the walls of the room. I placed a comforter on the ground and covered that with another white sheet for the floor of the room. All in all, I think the cost for this shoot was somewhere around $60 or $70 (closer to $100 if you include the jacket). Since I purchased several pieces for the shoot over the span of several months, I honestly lost track of the final cost, but compared to most of my other ideas, this one was on the pricier side.
Click on thumbnail for larger image.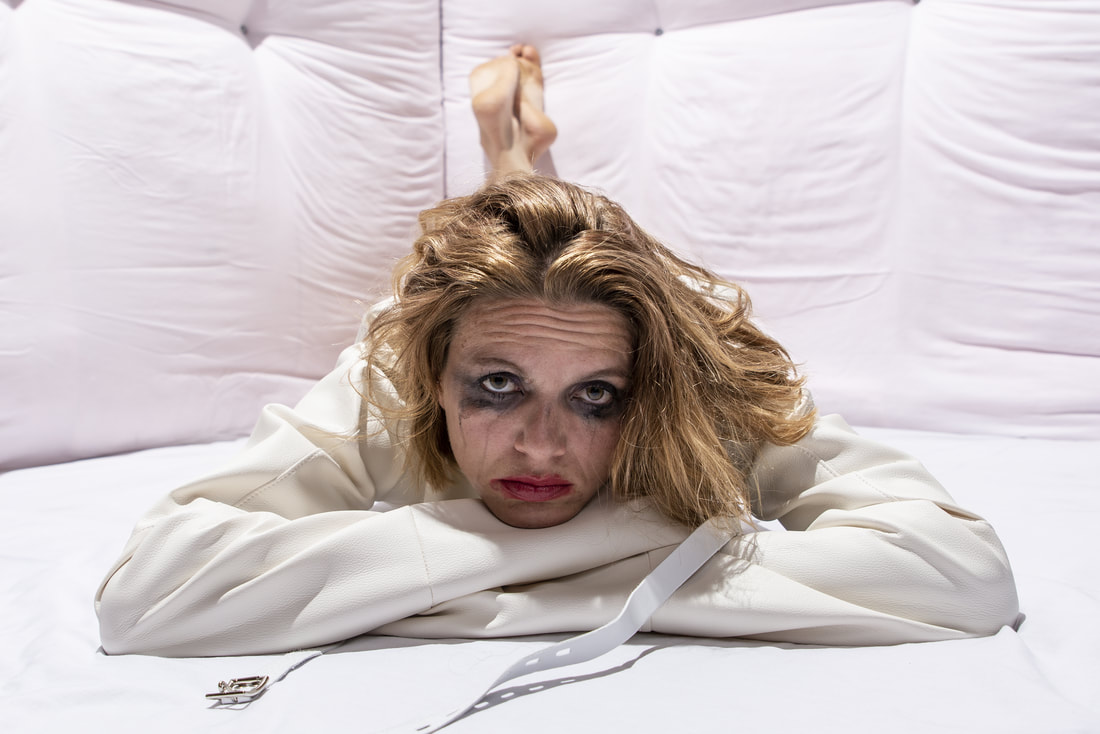
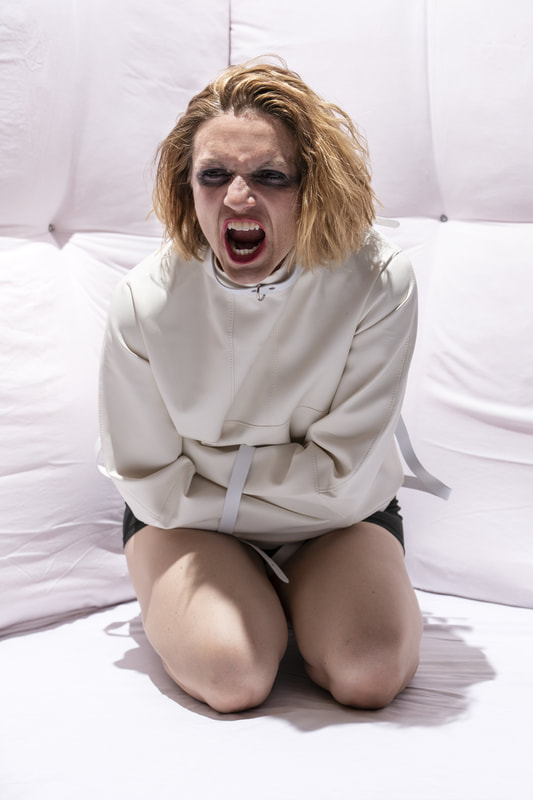
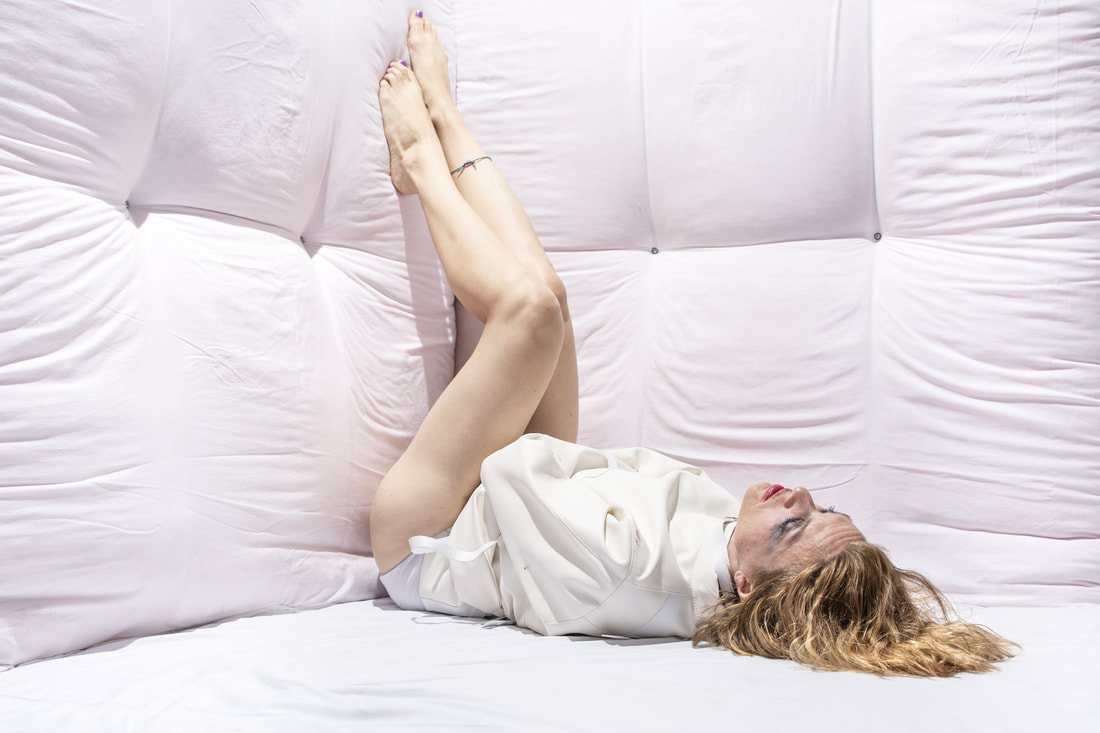
Once everything was set up inside of a garage, all that was left was taking images and playing with different poses and ideas. For most of the images, I simply flooded the scene with lights from just about every angle. I wanted the look of a room that was so bright with no relief that the feeling of the room itself would drive someone crazy. An overhead bare flash with no modifier worked perfectly to simulate a ceiling light. The fact that we only created a corner of a room with no ceiling left open the option of some other creative use of lighting and camera angles. Despite being bound-up for the majority of the shoot (which I probably couldn’t have done) Alecia did her thing and played the part to perfection.
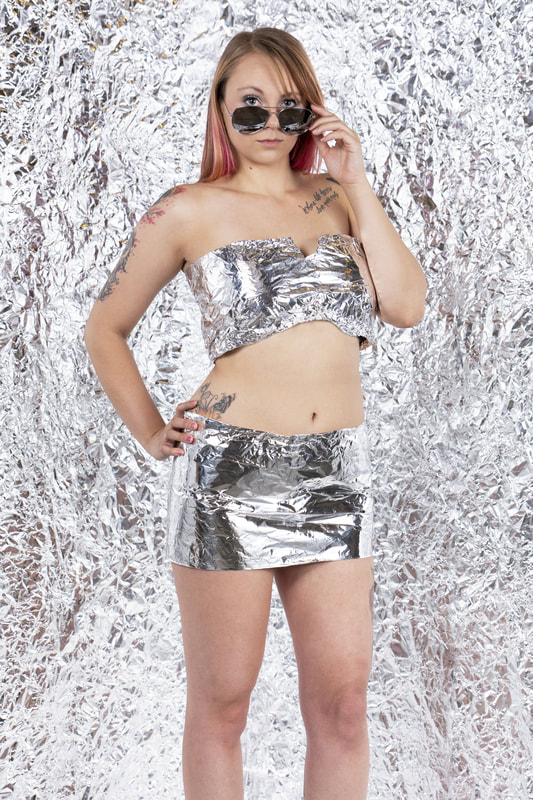
Despite this shoot costing more than my normal shoots, it was well worth it! This idea was also fun because I got to work with my hands and build a corner of a room. I enjoyed that just as much as the actual shoot. Plus, I’m not a drinker and I rarely gamble so photography seems like a decent vice to spend money on. Although I’m not quite sure what I can do with all of the insulation leftover from the shoot, the wooden boards have come in handy for other ideas – like aluminum foil. Lots of aluminum foil.
As always, get out of your comfort zone, build some props for an idea, and have fun. If you don’t find a way to express your creativity, you may just go insane!
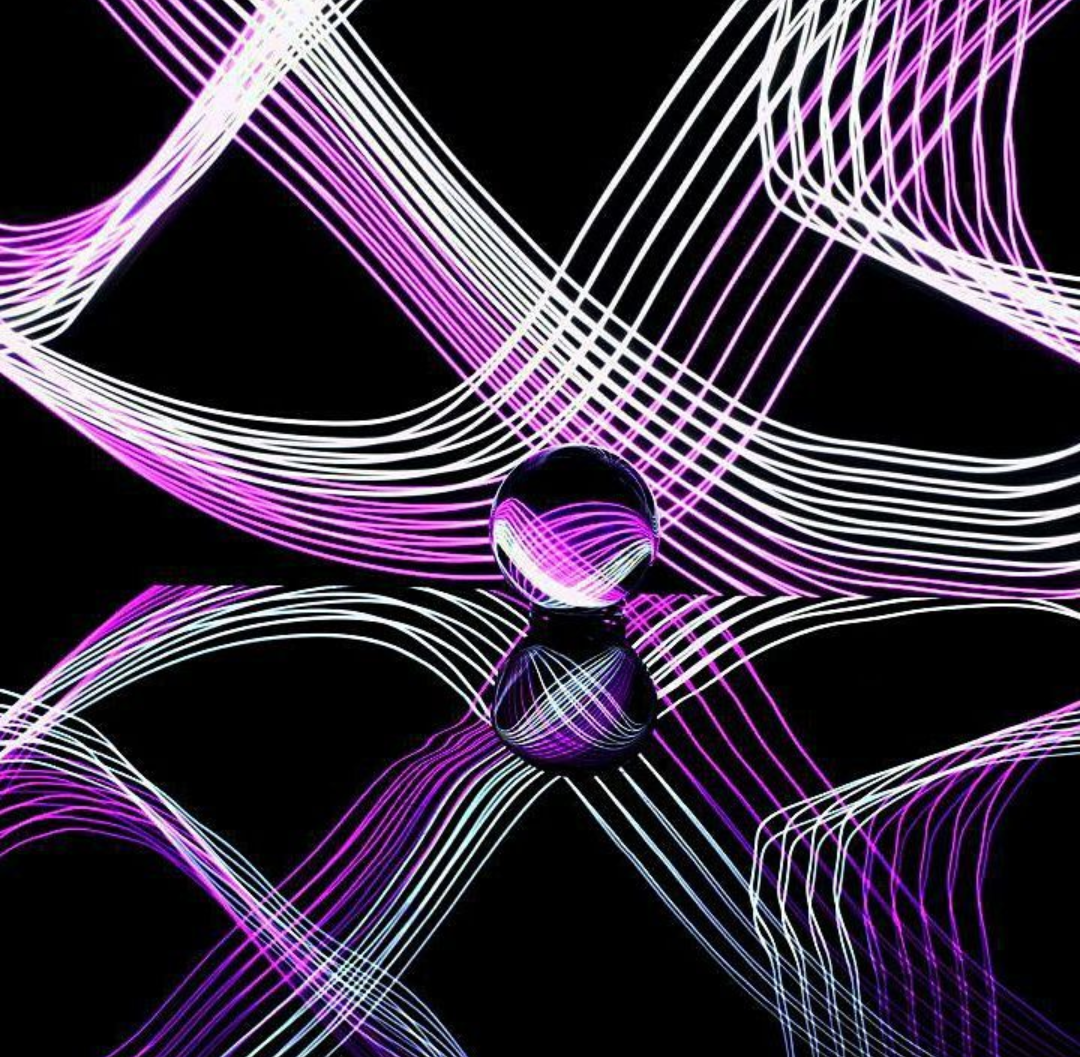
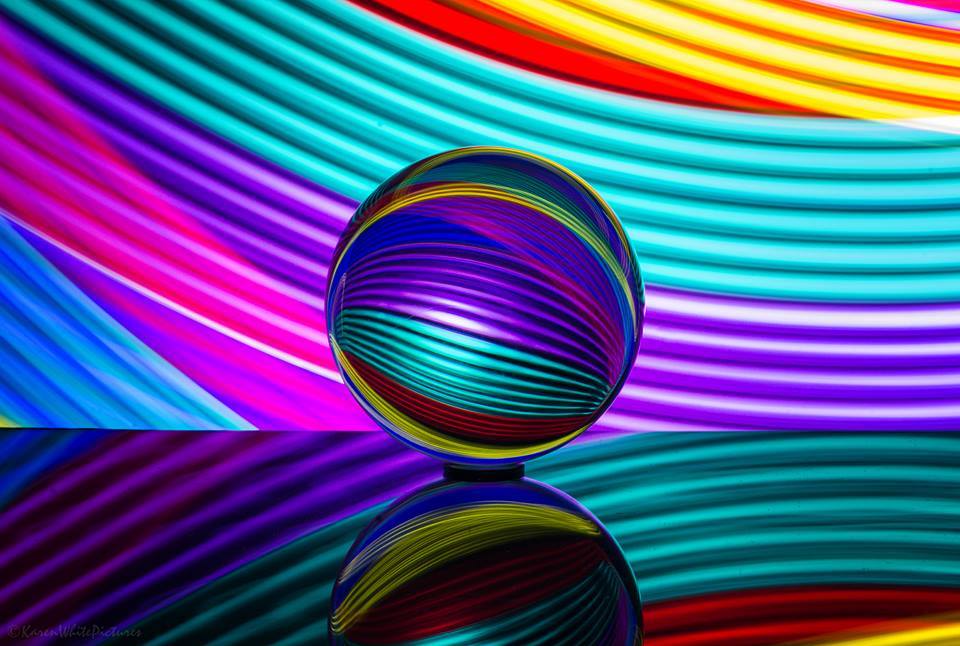
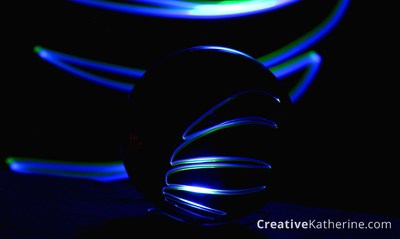
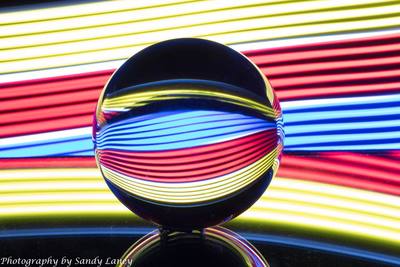
A while back I saw a post on Facebook from a school and the kids at the school were trying to see how far they could get an image to travel online. After perusing the comments, it was obvious the image had traveled far and wide. I’m sure you’ve often heard about the perils of posting images online that you may one day regret. Once an image or video is posted online, it takes on a life of its own and can spread to far off places, even if the original content is deleted from the internet. This got me thinking, ‘How far has my work traveled?’ To answer my question, I researched some of my images and videos. 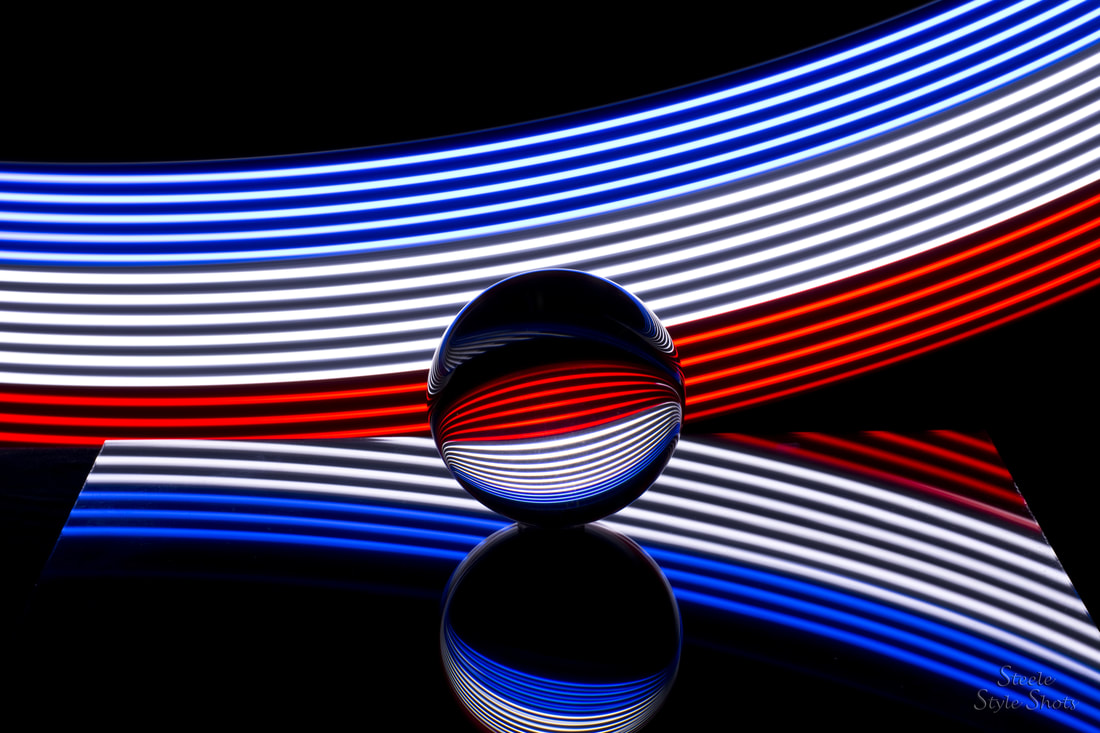 For images, you can do a reverse image search to see where the image is posted on the internet. My crystal ball image is, by far, my most ‘popular’ image on the internet. On some of the shares of this image, my watermark is still intact and there is some sort of credit back to my original post. However, this is also probably my most stolen image as well with most versions cropped to eliminate the watermark or edited out completely. This image has been used on everything from generic web page banners to pornography sites. It used to bother me that my image was being used on other pages without the watermark or consent. After a while however, I found it more entertaining than upsetting. In fact, I have since stopped watermarking my work. I’m still intrigued how this image is seen as erotic enough to be used on porn sites, but hey, to each their own. A lot of light painting sites use this image to link to tutorials about light painting in general without ever using the image in the tutorial itself. I guess it could be considered a click-bait image. In addition to the use of the exact image itself, a reverse image search also yields images that are similar in composition. I guess I shouldn’t be too surprised as the YouTube tutorial for this image is one of my most watched videos. A few individuals have also contacted me about images and tutorials (here and here) they created as a result. Although it is far from being a ‘viral’ image, I still think the attention it gets is cool and I love it when others contact me to share their results, most of which are absolutely stunning! Click on images to be directed to artist's site, if available.A lot of my food and unique portrait photography seems to wind up on Pinterest quite a bit in ‘idea’ type folders. The levitating hamburger and fruit drops images appear to be the most shared images on Pinterest boards. The nice thing about Pinterest is that the images are usually added to Pinterest boards from one of the original source images so the link back to the original post is usually intact. Several of my Halloween images wound up on scary Pinterest and Hiveminer pages as well. I am currently working on a series of images related to diabetes that I’m hoping finds a wide audience for awareness purposes. 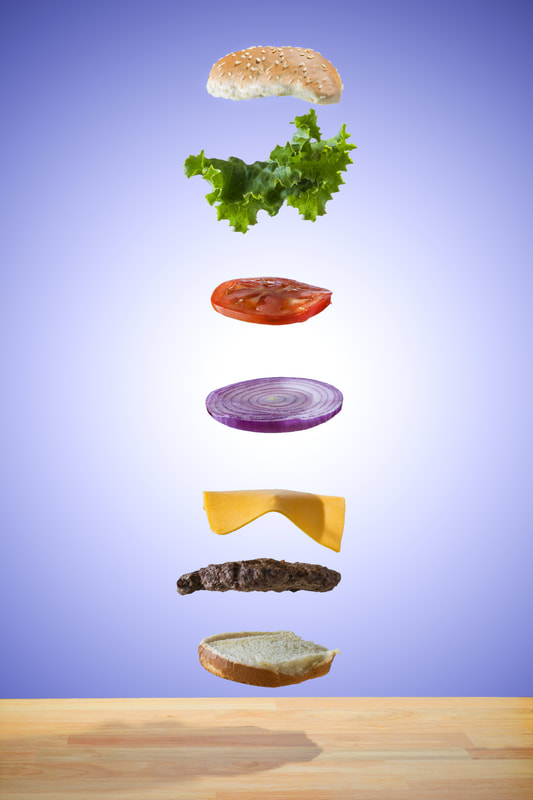 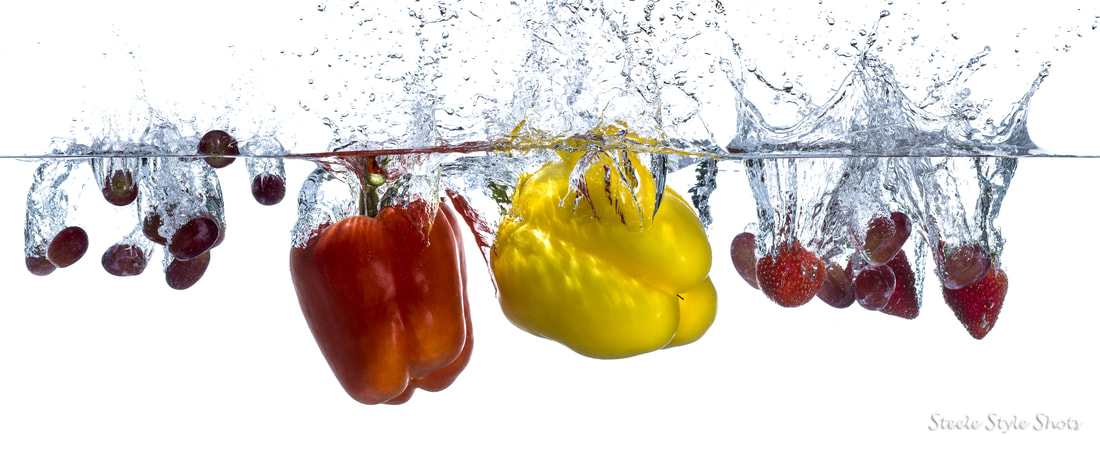   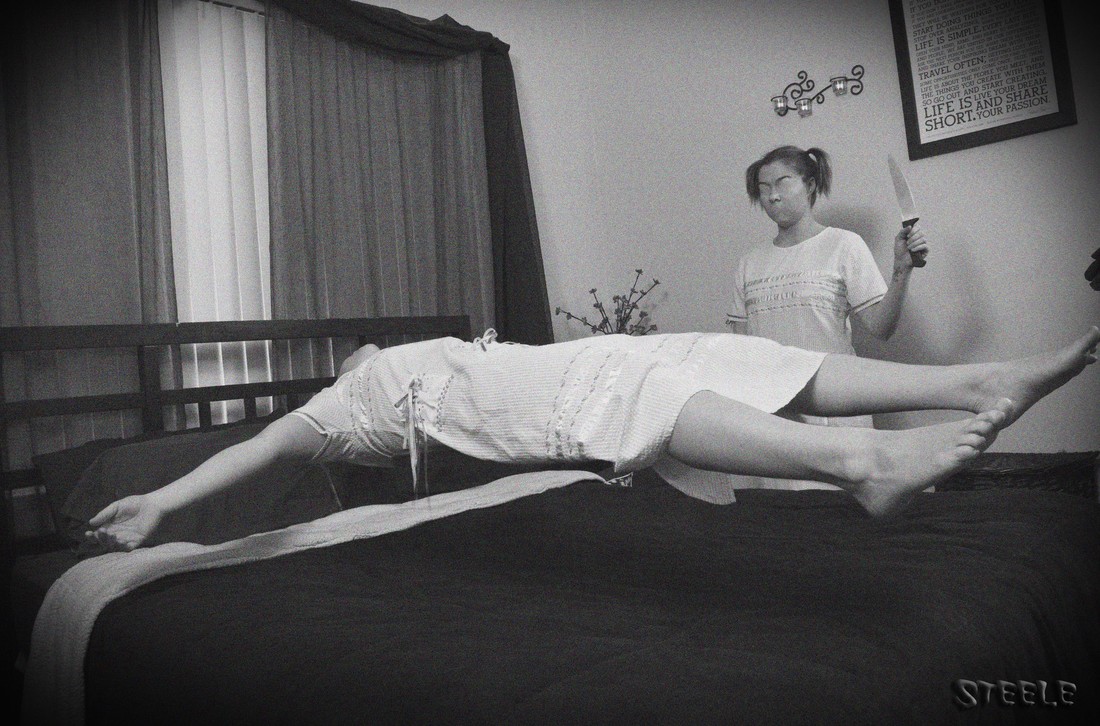 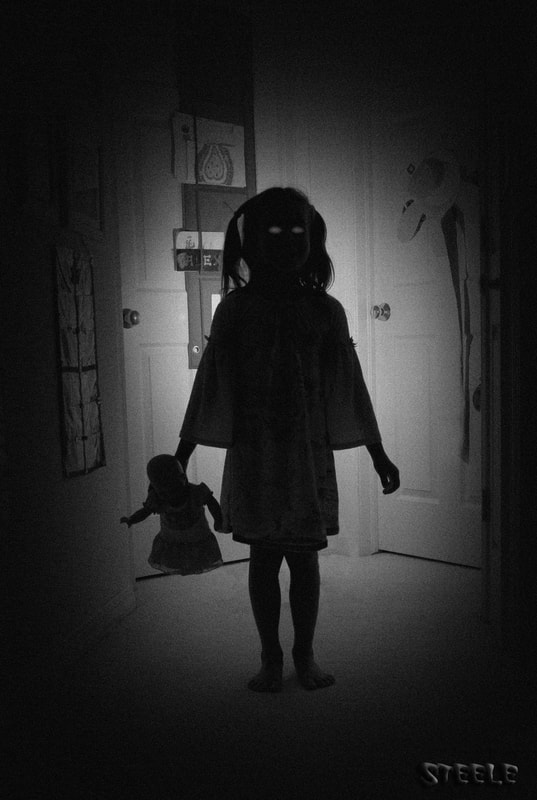 Videos are a completely different beast. Although I upload my videos exclusively to YouTube and Facebook, I have discovered that there are numerous other video sharing sites that have picked up my videos. My three most watched videos are the steel wool and fire light painting video, the how to make colored powder video, and the crystal ball tutorial video mentioned above. Each of these videos has been posted and shared to more sites than I have time to chase down. Some sites will even allow you to download the entire video, which I think is kind of cool! My Greek Goddess Iris video has also been shared on a conspiracy theorist’s Facebook page. Maybe I accidentally inserted some illuminati symbols in there? That one is still a head-scratcher. Statistics for my YouTube channel indicate that the majority of my audience is 25-34 years old and predominantly male (76%). Interestingly enough, the United States is not the top viewing Country – c’mon peeps! India holds that spot with 26% followed by the US at 20%. It blows my mind that people in Greece, Russia, Finland, Hong Kong, Chile, among some 50 other countries, actually watch my videos (a huge reason why I try and include closed captioning/subtitles on my videos for translation purposes). It also makes it interesting trying to respond to questions in different languages. Fortunately, there are several online translation sites that I use often. I just pray they’re translating my responses correctly.  Technology has made our world seem a lot smaller (the jury is still out on if that is a good thing or a bad thing). The fact that you can post an image or video that can make its way around the world really is an interesting phenomenon. When I started photography, so many other artists from around the world influenced my creative process and the fact that I am now sparking creative ideas in other individuals half way around the globe is beyond rewarding. I can attest to the school’s experiment that an image or video can travel much further than anticipated and probably a lot quicker than expected as well. If you’re an artist and want to share your work with as many individuals as possible, post it online! If you have an image or video you’re not sure you want popping up years from now, keep it under wraps. Once it’s out, there’s no bringing it back. And if your picture winds up being used on the banner of a porn website, don’t be surprised!
|
SteeleKeep the interesting parts of life in focus. Archives
November 2020
Categories
All
|
 RSS Feed
