I love well done levitation photography! The funny thing about levitation photography is that it is relatively easy to create. In this post, I will describe two common methods to achieve levitation and walk you through an example of exactly how I go about doing it. For those of you out there that suffer from ‘stop wasting my time and just get to it’ syndrome, please feel free to scroll down to the bottom and watch the instructional video on how I create levitation images. For those of you wanting a little more detailed information, read on!
Obviously levitation is impossible. There is no getting around the laws of gravity. So when someone sees a well done levitation image, it makes them stop and wonder how it was done. With a little research, it’s fairly easy to learn how to make someone, or something, look like it is levitating. The more complicated part is finding a composition that makes the entire image more interesting that just a person in mid-air. A good levitation image should attempt to tell a story.
Equipment for basic levitation photography consists of just a camera, that’s it. Sometimes a tripod can be useful but not necessary. Equipment for more advanced levitation consists of a camera, a tripod, and some type of photo editing software that will allow you to combine images. You do not have to have the latest and greatest software to get stunning results. I use Photoshop CS4 but any decent image editing software will work just as well.
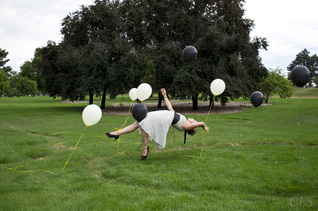
The first method in creating a levitation image is to simply get a picture of someone in mid-air. Taking a picture of them as they jump is a good example. You can also attempt to get a picture of them falling forward or backward. This can sometimes be a little challenging as you may need to repeat the process until you get the perfect image. Timing is everything when using this method. You will most likely get some images that were taken just a tad too late and others taken just a tad too soon. You also want to make sure your shutter speed is fast enough to freeze the action. The floating object should be as sharp as possible for a convincing levitation image. Blurred edges on the floating object will make it look like you simply took a picture of the object or person falling which is not that convincing. Poses can be hard to get perfect as well. Benefits of this method are that it is simple and straight forward, does not require any additional equipment, and requires little to no post processing. One of the drawbacks is that the images may not be as convincing as some of the images that you can create with the second method. 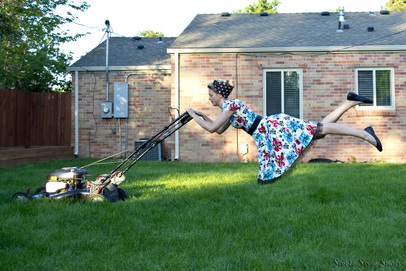
The second method in creating a levitation image requires more equipment and time but can sometimes yield more convincing results. For this method, you will need at least two images. One image will be of your subject resting on some object and the second image will be the same scene with no subject or object in the picture. You then combine certain parts of both images to create a new single image. The best way to do this is to have your camera set on a tripod focused on a certain area. Make sure your camera is set in manual mode and DO NOT move the camera once it is set up and ready to go. If your camera is in automatic mode, the focus may shift, the aperture may change, the ISO may change, or your shutter speed may fluctuate between images as well. You do not want this to happen as one image may be lighter or darker than the other image making the process of blending multiple images together more difficult, but not impossible. The benefit of this method is more realistic and creative images. Drawbacks of this method include the additional required equipment and the time required to edit the images in post.
I typically take a picture of the subject resting on an object first followed by the second photo with nothing in the scene. There is no real reason for doing this other than it reminds me to take that second shot before moving my camera. If you are doing this outside, make sure the images are taken relatively close in time as the changing angle of the sun can change the lighting of the scene. Although not absolutely necessary, I like to have my model wear clothing that drapes quite a bit. This helps to both cover up the object they are resting on and the draping fabric adds to the illusion that they are actually defying gravity. Other ways to increase the effect include dangling jewelry, hair down, etc. Once you have at least those two images, it is time to combine them in an editing program. 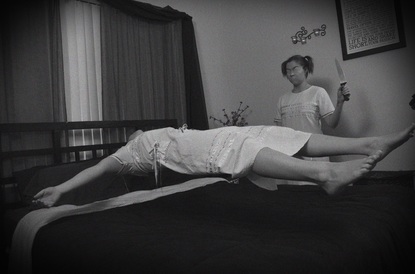
Again, I use Photoshop CS4 but any editing program that will allow you to stack images together and create different layers will work. Open both of your images. In Photoshop, I place the image with the person resting on the object in a layer above the empty image and erase parts of the top image (levitating person) revealing the empty image below. If your camera was on a tripod, the images should match up perfectly. If you kept the camera in manual mode, the brightness, contrast, and color should be identical between the images as well. After removing the object used to rest on, touch up the photo as normal and combine (flatten or merge) the images together into one image. If you are working with an image where the levitating person or object casts a shadow on the ground, you can add that shadow back into the image making the image look very realistic. There are several ways to do this and I plan on having a tutorial on this topic in the future. The video for this post does go into a little detail on how to create a very simple shadow underneath an object.
If you are more of a visual learner like myself, the following video will walk you through the process described above in creating a levitation image. If you have never tried it before and want to give it a shot, I would love to see your results. If you have done several levitation photos before, I would love to see your best picture. Either way, get your camera out and try something new and different – something outside of your comfort zone. And don’t be afraid to mess up. It’s just a reusable memory card!
0 Comments
Leave a Reply. |
SteeleKeep the interesting parts of life in focus. Archives
November 2020
Categories
All
|
 RSS Feed
