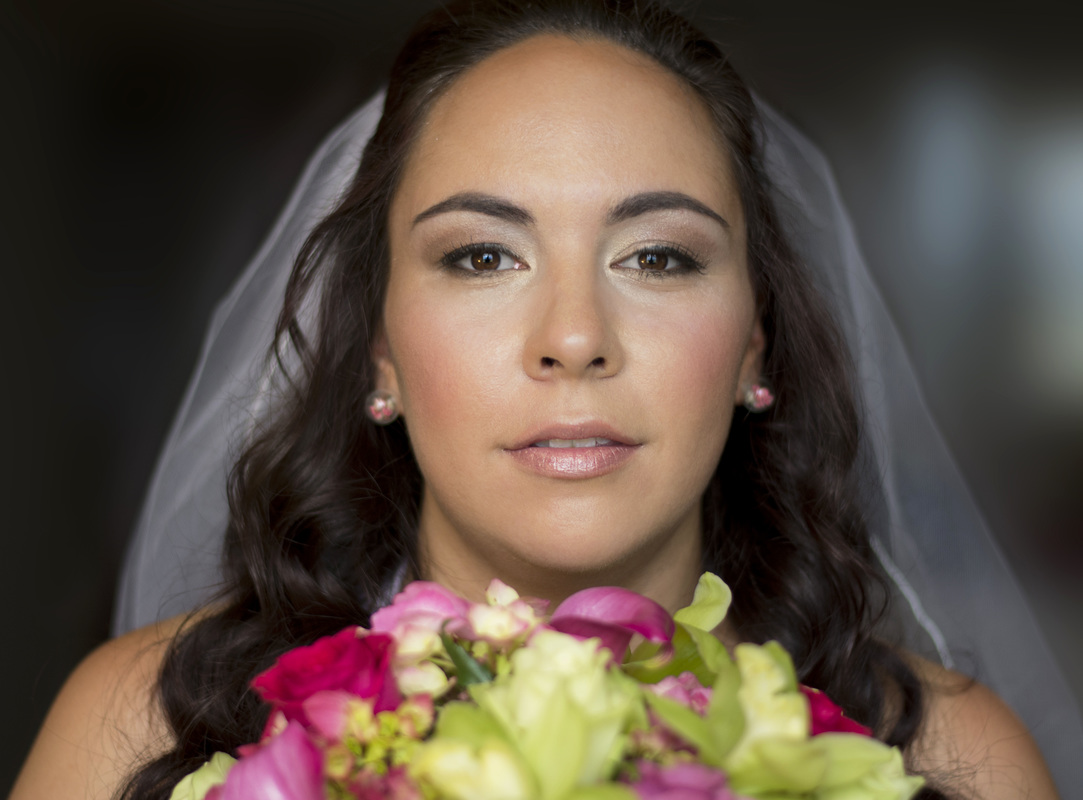
 So you want to shoot a wedding? You better bring your ‘A’ game. Weddings are work. A lot of work. Typically I advise people that the equipment is secondary to being able to create good compositions and understanding light. Well, much like astrophotography, weddings are a different breed. If you’re lucky, the wedding you want to photograph will be outside on a nice overcast day, but if your wedding is inside, or both inside and outside, you better have the appropriate gear.  I highly recommend having a full frame camera, or even a medium format camera if you can afford it. Although crop sensor cameras and micro four thirds cameras are getting better and better with low light photography, they simply can’t compare to the light gathering capabilities of a full frame sensor. Can you still get decent images with a micro four thirds or a crop sensor camera at a wedding? Sure, but you better have good glass. A wedding is not the time to discover you cannot get good images because of the lack of decent equipment. 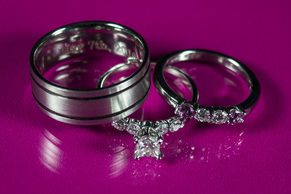 Most photographers that do weddings on a regular basis will typically carry two camera bodies and at least 3 lenses. A good macro lens is crucial for those detail shots, like the wedding rings or details on the cake. A good fixed focal length lens such as a 50mm or 85mm are good choices as well for some portrait type shots. For wedding venues that aren’t all that large, a 24-70mm f/2.8 lens is going to be your workhorse. If your venue is larger and you want to get good close-up images from a distance, I would strongly recommend something like a 70-200mm f/2.8 lens.  I was recently asked by a very good friend to be the photographer for his daughter’s wedding. Weddings are not my first choice for a fun weekend shoot, but as anyone that follows me knows, I love a challenge and I try my best to stay outside of my comfort zone. Shooting this wedding was the furthest out of my comfort zone I have ever been. Since I did not have a decent constant aperture lens, I rented the Nikon 24-70mm f/2.8 lens. I am hoping to do a separate review of this lens but long story short, it’s amazing! I knew this lens would give me the reach I needed because I visited the venue about a month before the wedding. DO THIS!! If you are going to shoot a wedding, especially indoors, go look at the venue before the wedding so you know exactly what you will need. Besides the 24-70mm zoom, I already had a prime 50mm lens and a macro lens as well. Roughly 90% of the wedding I shot with the 24-70mm lens, and almost exclusively closer to the 2.8 aperture. 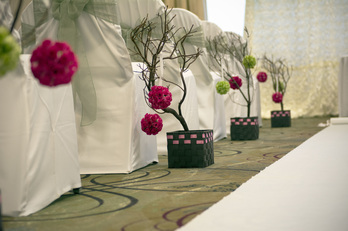 After having the fastest lens you can get, you’re left with two options to get the correct exposure; ISO and shutter speed. To avoid motion blur for moving subjects, you need to set your shutter speed to at least 1/125 of a second or faster. Even with a fast lens, this is a relatively short exposure time. You will have no choice but to bump up your ISO. This is where a full frame camera will pay dividends. The higher you set your ISO, the more noise you will start getting in your images. A crop sensor camera and a micro four thirds camera will have to bump up their ISO much higher to get the same exposure as a full frame camera at a lower ISO setting. At this point, you will simply have to experiment with your ISO and shutter speed to capture the best images possible. For an indoor reception, there is simply no getting around the need for a flash, either on camera or off. I know some photographers that will carry the flash in one hand and the camera in another to avoid those flat looking images you get with an on-camera flash. If you are going to use an on-camera flash, try every angle for bouncing the flash off of other surfaces before aiming the flash right at your subject. If you must aim the flash at your subject, at the very least, get some type of diffuser to aid in eliminating harsh shadows. Aside from equipment, a wedding is very demanding. It is a long day constantly on your feet and moving around. If you are thinking about shooting a wedding, volunteer as a second camera for a wedding or two before you go as the primary photographer. Do this not so much to learn how to get great images, but more for understanding the flow of a wedding and how fast they actually progress. By being a second camera for a few weddings before your own, you will learn some posing techniques and how other photographers lead couples and crowds, but the biggest benefit is seeing the flow of an entire wedding from the perspective of a photographer from beginning to end. 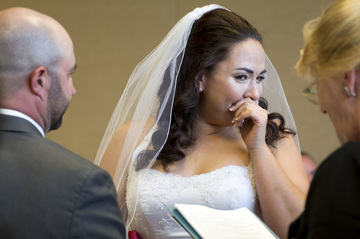 I am honestly on the fence as to whether or not I will do more weddings, but if you are thinking about doing a wedding, properly prepare yourself – both mentally and with the proper equipment. Find a wedding photographer that doesn’t mind having a second camera helping out and get that experience. You never know. Simply volunteering for a wedding may help you make up your mind if it is something you really want to do. I can honestly say that, besides the chaos of the wedding itself, I found myself smiling far more during editing than I have with any other shoot. There are some really tender, touching, and funny moments during a wedding. Capturing those moments of time forever in an image is very rewarding. Read as many blogs as you want and watch as many videos as you can, but nothing beats personal experience. If you want to experience a wedding behind the camera, do it! Just be prepared. There are no do-overs!
10 Comments
Merriam dictionary defines photography as “the art or process of producing images by the action of radiant energy and especially light on a sensitive surface (as film or an optical sensor)” – emphasis added. In essence, photography is about capturing light. Any photographer that has taken more than a few pictures can tell you that lighting is EVERYTHING. Photography is the art of understanding and manipulating light. For the most part, there are two types of light photographers use; natural light and artificial light. Natural light is the light you get from the environment, most often from the sun. Some people consider ambient light as natural light as well. Ambient light is the light you have available during a shoot that you don’t really have a lot of control over. Ambient lighting can include lamps, ceiling lights, or even candles. Artificial light is pretty much everything else that photographers use to control the lighting of a particular shot. There are great debates between photographers that prefer natural light versus those that prefer artificial light and which photographer is ‘more skilled’ based on their ability to use one exclusive to the other. I’m not here today to throw fuel on that fire – a debate I actually find ridiculous. Instead, I’m here to talk about a recent shoot I did where I fell in love with equipment I already own, and quite honestly, already loved. Out of all of my equipment, there is one item I repeatedly recommend to others that they should buy. If you are a photographer looking to break into the world of speedlight or flashgun photography, do yourself a favor and look at the Yongnuo flashes first – specifically the III series. They are simply incredible. These third party flashes are a fraction of the price of comparable Canon or Nikon flashes and perform just as well, if not better, in most circumstances. The only caveat to these flashes is that they may not be quite as powerful as some of the name brand models, but I have yet to shoot in a circumstance where I couldn’t get enough light from these flashes. Even if I do run across such a situation, I will simply use multiple flashes to increase the light output. 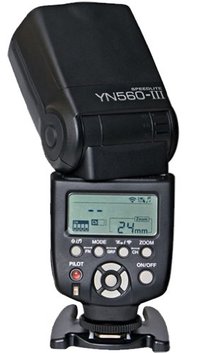 Since I use Nikon equipment, I will use their products as a comparison. Decent Nikon flashes can range from about $150 to well over $500 for the more advanced units. The Yongnuo 560 III is currently selling for about $65. There is a newer model, the IV, that is slightly more expensive at $70. Even if you had a situation where the Yongnuo isn’t as powerful as the Nikon equivalent, again which I have yet to encounter, you could still buy several Yongnuos and still be at about the same price as one of the cheaper Nikon models. From a purely financial standpoint, the price alone makes these flashes the better buy. The 560 III I am reviewing here is not a TTL (through the lens metering) flash. For the type of off-camera flash photography I do, the camera typically gets it wrong with TTL so I shoot manual almost exclusively for off-camera flash photography. 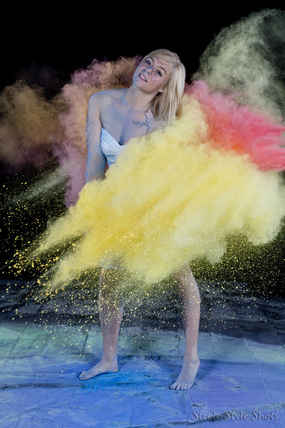 But the proof is in the pudding, as they say. How do they perform? I have had at least one of these flashes for several years now. In fact, I now own four of these flashes and wouldn’t hesitate a second on getting others should I need them. One of my first shoots with these flashes, I used four flashes, two of which were set to full power and the other two set at half power. And no, it was the composition of the shoot itself that dictated the flashes be set that high and not that the flashes were generally not strong enough. In retrospect, I probably could have dialed down the power on all of the flashes for the shoot and it still would have come out just as great. Aside from this shoot, I doubt if I have set my flashes higher that half power since. Simply haven’t needed to. Given the price of the flashes, I wholeheartedly expected the flashes set on full power to fail sometime during the shoot. You get what you pay for, right? The flashes performed amazingly – for that demanding shoot, and every shoot since. I have dropped a couple of flashes over time and they still have yet to fail me. 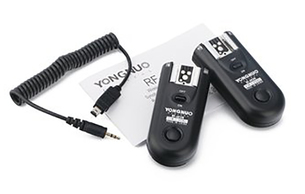 If you want to get your flash away from your camera for some ‘strobist’ work, you have several options. I purchased the Yongnuo RF-603 wireless flash triggers. You simply slap one on the top of your camera and the Yongnuo flashes will trigger whenever you take a picture (when set in the right mode). The flashes DO NOT have to be attached to the camera. They are triggered by a radio signal from the flash trigger. I have yet to find a circumstance where the distance was too great for the flashes to receive the signal. I have tested the combo at a maximum of 50 feet and they still worked. These are decent wireless triggers. There are definitely better ones on the market but these do exactly what they claim to do without fail. The only downside to these basic triggers is that they only send a signal to trigger the flash(es). They cannot control the power level or zoom of the flash heads. 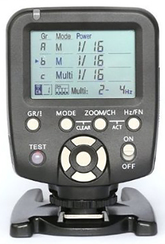 For complete control of the 560 III, consider picking up the Yongnuo YN560-TX flash transmitter. This device mounts on the camera flash shoe and allows you to remotely trigger several flashes, again, wirelessly. Not only can you group flashes together and fire them separately from other groups, you can also control the flash power and zoom of each flash independently right from the controller. No more going back and forth to an off camera flash adjusting the zoom and power until you get the look you’re after. This flash trigger can be had for about $40. Rumor has it the 560 IV flashes have this built into them so you don’t need to buy it separately, but I have been so happy with the 560 III that I have yet to move to the 560 IV. 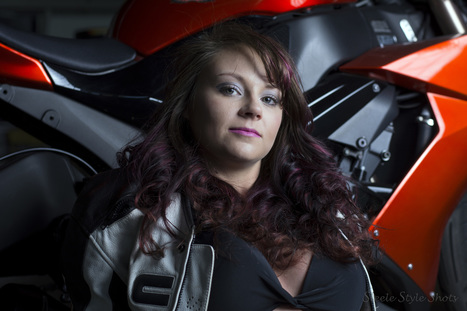 Now on to the shoot that sparked this article! I recently had a motorcycle/model shoot where we took some images outside using some natural light and some images inside using artificial light. We started with the outside images because the weather was a tad cold and it appeared we might encounter some rain if we waited too long. After the outdoor session, we moved into a garage and I began to setup my lighting equipment. Much to my dismay, I could not find my YN560-TX flash transmitter to trigger my flashes. At first, I figured we would have to forgo the inside images until I realized I also keep at least one RF-603 trigger in my bag as well. But before I grabbed the RF-603, I toyed with the idea of using my flashes in slave mode. So, I gave it a shot. Slave mode allows me to place one flash on my camera and other flashes off camera wherever I want. When the flash on the camera goes off, the light emitted is ‘seen’ by the other flashes causing them to trigger as well. I set the power of the flash on my camera to its lowest power so that the light from it did not affect the lighting I wanted in the scene. After setting the off-camera flashes to slave mode, we started in on the shoot. The system worked great. There was a time or two that the remote flashes didn’t ‘see’ the light from the on-camera flash, but I quickly corrected that by increasing the light from the on-camera flash one level higher, or 1/64 power. The results were amazing and other than having to manually change the power setting of each flash, I didn’t miss the YN560-TX transmitter too much, but it still would have made it easier. 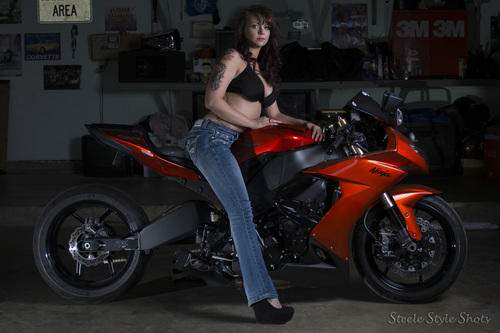 I have yet to have a flash fail on me and they are continuously reliable. I run the flashes and transmitters off of rechargeable Eneloop batteries (which is another product I may review and highly recommend). If you are in the market to get into flash photography, or even if you are already doing flash photography and simply want to get some additional flashes, you cannot go wrong with the Yongnuo 560 III flashes. You can easily get 4 flashes and a transmitter and still be under the price of Nikon’s or Canon’s higher end flashes. They have models for Canon, Nikon, and other brands as well. I cannot speak to the newer 560 IV model as I have not tried them. A friend of mine did purchase a 560 IV and had to return it as it stopped working. However, I do not know if it was simply a bad flash or if the quality control has decreased with the 560 IV. Even then, should I need additional flashes, I still would feel very confident trying the newer model. Despite the fact that I still haven’t located my YN560-TX transmitter and may have to buy another one, I simply cannot recommend these flashes highly enough.
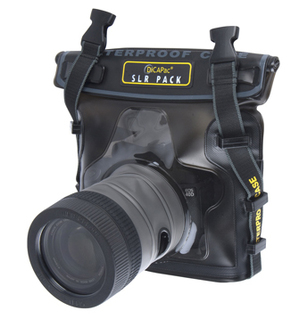 Wish you could get some awesome underwater shots with your camera but the thought of taking your expensive equipment underwater makes you break into a cold sweat? Yeah, I get the same chills. About two years ago, I started researching the best way to take my land-bound DSLRs into the water. Obviously you can purchase an underwater camera, but I wanted to make it happen with as little cost as possible without investing in another camera. Once you start researching underwater housings, you quickly discover two options. You can buy a clear hard case housing designed to allow you to operate most of the functions on your camera for a price that is probably more than the cost of the camera itself, or you can purchase what basically amounts to a fancy ziplock bag at a fraction of the cost. The hard-case options are usually brand AND model specific. If you buy a new camera or want to use a different body, even from the same manufacturer, it probably won’t work with the same hard-case. Trying to keep the costs to a minimum, I opted for the cheaper sealed bag route. I simply could not justify the cost of a hard case housing for what would probably amount to limited use long term. Enter the DiCAPac WP-S10 case. I purchased this case online for about $60 for a recent underwater shoot. The company has a couple of different models for DSLRs and I picked the one that would allow for a longer lens should I want to use a longer lens in the future. The bag closes with a heavy gauge plastic ziplock seal on the top (very much like a freezer ziplock bag). The top then folds over and is secured by a velcro strip. It folds over yet again and sealed once more by another velcro flap. There is a finger hole on the right side that allows for taking shots and two smaller finger holes on the lens portion that are supposed to allow you to adjust the zoom of your lens. The front lens housing has a detachable cap allowing you to change lenses if necessary. 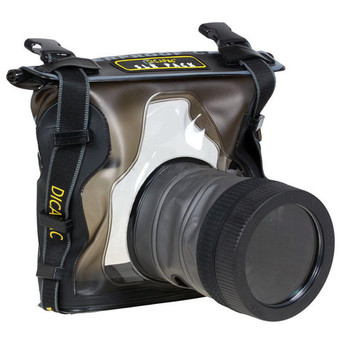 Upon receiving the bag, I followed the instructions and tested it. I placed toilet paper inside of the case and submerged the case in a fish tank to see if there were any leaks. To my surprise, there were! Water was entering the case around the removable lens cap at the end of the housing. It wasn’t a huge leak, maybe a bubble or two every 5 seconds or so. Regardless, water was entering the housing. I tightened the lens cap and re-tried the test. The second trial run was dry. I then later attempted a test with my cheaper camera in the case. I kept the bag submerged for about 10 minutes in a fish tank. Everything checked out ok. A few days prior to the actual shoot, I tested the bag again with the camera I was going to use for the shoot for about 15 minutes in a swimming pool. Again, everything was fine. All of my cameras have battery grips attached to them (astrophotography typically requires additional batteries). I had to remove the battery grip to get the camera to fit inside the case. This isn’t a big deal as I wasn’t really intending on having the camera underwater for that long. The case comes with small foam pads that you can place at the bottom of the bag to raise the camera body up if needed. I had to use these to get the lens to center in the lens housing. If you have a tripod mount on the bottom of your camera, remove it. Some of those mounts have sharp edges and might puncture the housing when placing the camera inside or taking it out. Also, it’s probably a good idea to remove any camera straps as well. I would highly suggest setting up your camera before putting it in the bag. Trying to get the correct settings after the camera is in the bag will most likely result in a nosebleed and some degree of a headache. Although there are finger holes to allow you to adjust some settings, it is difficult to use. My Nikons have a scroll wheel on the top right back side of the camera for shutter speed and with a little work, I can manipulate it to some degree. The scroll wheel on the front to change aperture is a little easier to use but still not something you will be able to quickly change over and over. Try setting the camera into aperture priority mode or even shutter priority mode. In short, the less you have to deal with, the better. I think this is one of the few scenarios I would seriously consider “auto” mode. If you don’t shoot in raw mode normally, this is the time to use it. Water has a tendency to soften the image and change/mute colors, especially the deeper you go. Shooting in raw allows you to recover as much information as possible. If you are going to take the time to do an underwater shoot, you don’t want to limit the best image quality by saving the images in a jpg format. 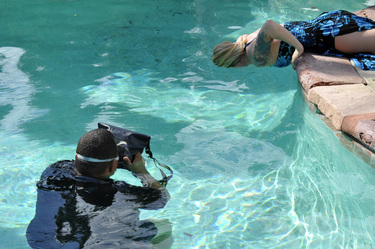 Copyright A.E. Photography Copyright A.E. Photography Actual under water use takes a little practice. For starters, it can be difficult to look through the viewfinder eyepiece to line up your shots. Keep in mind you will probably have goggles or a mask on making it even more challenging. If you have live-view, use it. It will definitely help. The bag has air in it and will act like a buoy sometimes making it a little difficult to keep steady underwater. Also, if you have the longer lens version of the case with a shorter actual lens, you will find yourself reaching forward with your left hand to pull back the lens housing to prevent the housing from showing up in your images. Keep in mind you are doing all of this as your body is moving around and floating to the top as well. If you can, find a way to anchor yourself in position before beginning. I would also recommend placing some desiccant bags in the housing to prevent the inside from fogging up. Like most photography, it’s a lot about trial and error. Overall, I was pleased with the outcome of the shoot using the housing. I like that the housing is cheap (relative to the hard plastic housings). I also like the fact it is fairly universal allowing me to use any of my DSLRs. Our underwater shoot lasted about 3 hours and the camera was in the pool the entire time. Some shots were at the surface and others were taken at the bottom of the pool (roughly 6 feet deep). There were times I needed both of my hands to move something in the pool or assist a model and I would simply let go of the case and it would float to the top of the water. Honestly, after about 20 minutes of use, I had no concerns about the safety of my equipment at all. I will admit that I kept the camera in the case the entire shoot and did not take the camera in and out of the bag to check images or download pictures. Once it was sealed and working, I let it be! The clear lens piece at the end of the housing didn’t seem to interfere with the quality of the images. Obviously the biggest factor with image quality will be the water column itself. At first, I used the strap that comes with the housing but took it off after a while. I found it was just another item I had to make sure wasn’t floating in front of my lens during a picture. 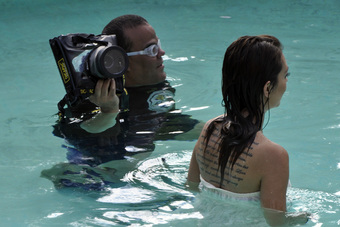 Copyright A.E. Photography Copyright A.E. Photography There are some drawbacks to the housing however. The ability to use most of the camera controls is very limited. The lens portion of the housing is bulky and will require some attention to keep it out of your shots. The housing is buoyant and you will sometimes find yourself fighting your camera to keep it under water. I have read some reviews were people have placed something heavy in the case with the camera to assist in keeping it under water. The finger holes in the housing to adjust zoom and to snap a picture seem a little on the small side to me but perhaps I just have big fat fingers. I was hopeful I could use the pop-up flash on my camera if needed, but the housing did not line up for my flash to be effective at all. Luckily we did the shoot on a bright day and a flash was not necessary. The housing itself is a little on the big side and sometimes the camera shifts enough that you have to move it around before taking your next picture. If you are looking for a relatively cheap option for taking your DSLR in shallow waters, give it a try WITH TESTING PRIOR TO USE. For deeper use, I cannot speak to its ability. If you are looking for something that will stand up to repeated use at higher depths, it’s probably a good idea to look into the clear hard-case options. If I thought underwater photography was something I would do on a regular basis, I probably would have purchased something far more substantial. Keep in mind you are purchasing something around $60 that you are entrusting to safeguard your equipment probably costing thousands. Sometimes cheaper isn’t better so buyer be warned. Yes, the case has a warranty but only against the case itself. If it is leaking upon arrival, they will replace it. But if the case is leaking upon arrival and you have not tested the case before use, the warranty will not cover your camera. Having said all of that, the case worked great after making sure it was properly sealed. There were times I would just allow the case and camera to float in the pool as I was doing other things. Again, the case and camera were in use, in the water, for about 3 hours nonstop. At the end of the shoot, the inside of the bag and the camera were bone dry! Even if you don’t plan on submerging your camera, this is a great case for protecting your gear from sand on the beach or fine powder if you photograph color runs. I also think this case will come in handy when photographing mud runs and other wet/messy conditions. Based on my personal experience, I would recommend this bag for limited underwater use. 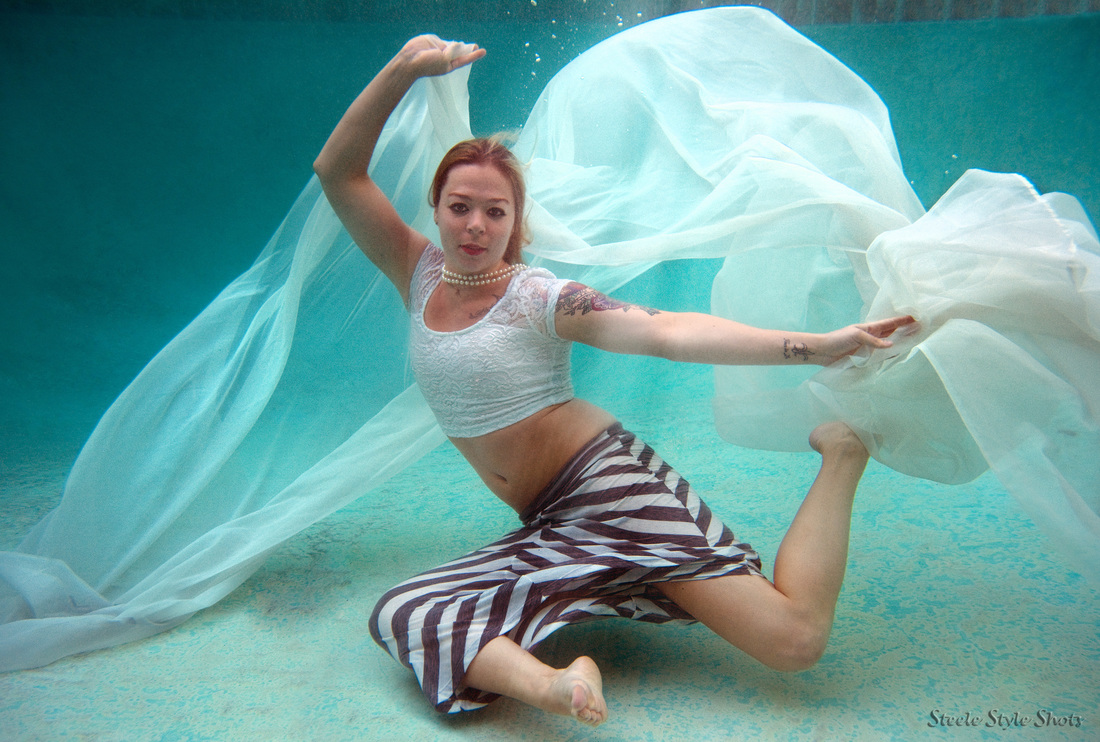 Anyone that follows my work knows that I like to experiment with my photography. Underwater photography is right up there! The shoot was a blast and we all had a lot of fun despite trying to overcome buoyancy. If you have any interest, give it a shot! You can get a lot of cool underwater photos and with some editing (some very specific editing), you can get some amazing pictures. However, editing underwater pictures is a topic all its own! Hoping to follow up with a tutorial on that as well.
|
SteeleKeep the interesting parts of life in focus. Archives
November 2020
Categories
All
|
 RSS Feed
