|
I have always had a fascination with light painting and photography. Some of the images I have seen online simply blow me away. Hopefully after reading this blog and watching the video, you too will be inspired to take a stab at this incredibly creative art form.
Light Painting with Steel Wool
Steel wool is cheap, can be found at just about any hardware store, and makes for some incredible light painting images. When purchasing steel wool, make sure you get steel wool with a very fine texture or grade. I get steel wool with a grade of #0000. Although you tend to get more sparks from this grade, experiment around with other grades as they can give you different effects. Find a metal container to hold the steel wool as it melts (burns) away. A metal whisk works out perfectly. I was lucky enough to find metal whisks with a metal loop at the end of the handle. Next, find something to attach to the whisk that will allow you to spin the whisk around. I used a short length of chain and a quick connector. Once you are set up and ready to go, take a pad of steel wool, fluff it out a bit, and place it inside of the whisk. Light the steel wool with a match, lighter, or even a 9 volt battery. After lighting the steel wool, swing it around. The faster you swing it, the further the sparks will fly! A friend of mine swung the steel wool while I manned the camera in the video and images. A word of caution: you are working with molten metal. Keep this in mind. Do this in an area where the risk of setting the surrounding area on fire is minimal. If using a model, be extremely cautious. These sparks can, and will, burn you! And as I learned on this shoot, it’s not a bad idea to have a fire extinguisher handy as well.
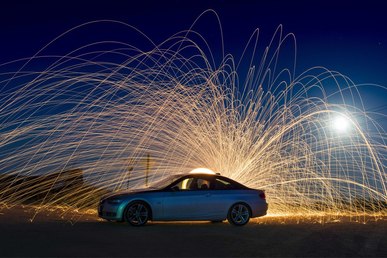
Camera settings. All you need is a camera that is capable of long exposures (with bulb mode if possible) and a steady tripod. In this case, we parked the car in front of a small puddle to get a reflection. My camera was set approximately 30 feet in front of the car. Since we did this shoot at night, I used a powerful flashlight to illuminate the model and car enough to be able to lock focus. Once I had focus locked, I switched to manual focus so that the camera did not hunt for focus before each shot (which it probably would have never found). I was using my Tamron 24-70mm on a crop sensor camera (D7100) closer to the 24 mm end of the lens. I set my ISO to its lowest, 100, and set my f-stop to f/9 but feel free to play around with your settings. We had a bright full moon out that night which provided additional light. I set my camera to bulb mode and began the exposure as soon as the sparks started to fly and ended the exposure as soon as they died off. Each shot was different but if I had to guess, the average shutter length was around 15 to 20 seconds long and bulb mode allowed me to start and stop exactly when I wanted.

The first couple of attempts were nice but the car remained in shadow, more or less. In an attempt to light up the front side of the vehicle facing the camera, I placed two flashes on the ground aimed at the model and vehicle. I set the flashes to rear curtain so they went off at the end of the exposure, that way, the person twirling the steel wool and the model knew exactly when the exposure was complete. Both flashes were set to ½ power. If I do a shoot like this again, I will put colored gels over the speed lights to get a better match in color on the car and model as compared to the sparks and the background color in general. I did adjust the hue and color balance on the car slightly in post, but getting it right in camera is always the better practice.
Light Painting with Fire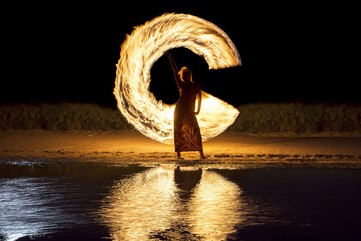
I got this idea from Zach Alan of Zach Alan Photography. The principle is very similar to the steel wool idea (or any light painting idea). You simply paint with fire behind your model. I used a ¾” wooden dowel that was 48” long. I then wrapped cotton around the top foot and a half of the dowel and secured the fabric in place with industrial staples. I also think wrapping the top portion of the dowel with natural fiber rope (like in my firewall tutorial) would work just as well. I then soaked the cotton in Coleman fuel (white gas) and lit on fire. We got decent light from the fire for about one minute then it started to slowly burn off and die out. Simply smother out the remaining fire with a damp towel and re-soak for more images. Make sure the fire and sparks are COMPLETELY out before pouring more gas on it. Since I was the individual light painting with the fire, I had my camera set to a two second exposure and had another individual trigger my camera. Some of the resulting images I had to edit and fix in post either because the camera stopped too soon or too late. In the future I think I will try triggering the shutter with radio triggers so I can precisely control when the camera starts and stops. I think this should be possible even while being the one light painting.
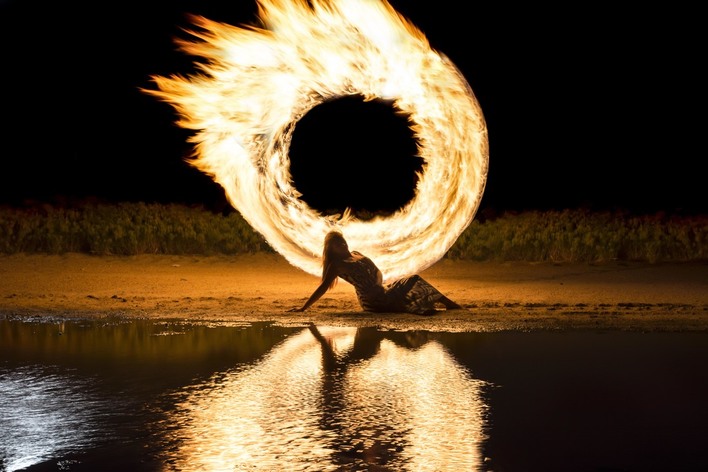
Camera settings – other than bulb mode, the settings were exactly the same. We did not use the flashes for the images with just the model.
Overall I am pleased with the results but would do things a little differently for both ideas should I revisit them in the future (which I most definitely will). Anyway, get out there and try some light painting with steel wool and fire, but be safe! No image is worth a visit by the local fire department or a trip to the emergency room! Well, most images, at least.
0 Comments
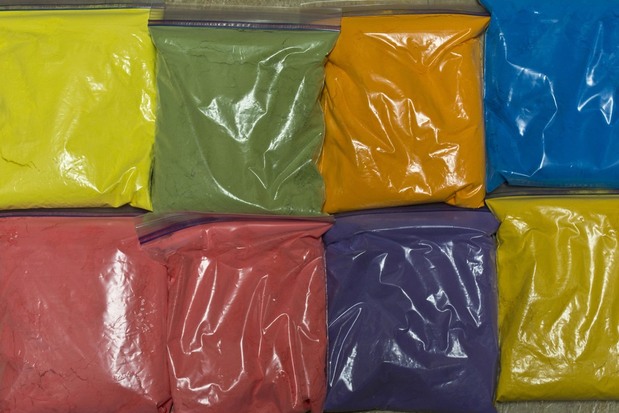
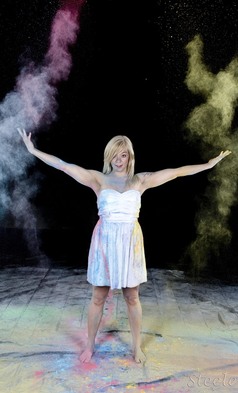
I have always loved brightly colored shoots that are unique and different. I’ve often wondered if my fascination with colorful shoots is tied in some way to my colorblindness. Anyway, I digress. When I first saw images of the Holi Spring Festival several years ago, I was blown away - so many bright and vivid colors. I researched images and found a few photographers that took the idea into the studio creating colorful powder/flour shoots with models. Obviously this idea was RIGHT UP MY ALLEY and I had to give it a shot. But where does one find colored powder in bulk for such a shoot?
The easiest way to do a colored powder shoot is to illuminate plain white flour with colored gels covering off camera flashes. Another method is to color the powder first and just use a regular flash to illuminate the powder and subject. A cool side effect of coloring the powder is that the vibrant colors will be visible on skin and clothing, especially white clothing. You can purchase Holi powder online but it is not cheap and for a large shoot you would need quite a bit of it. The last time I checked, a five pound bag of a single color was around $24 dollars, so roughly $5 a pound. I wanted to find a cheaper way to produce colored powder in large quantities. More research led to several online tutorials and recipes for do-it-yourself colored powder or Holi powder. I tried a recipe that involves regular flour and coloring but found it didn’t produce nearly the texture you get when using cornstarch. Although flour is cheaper, the cornstarch recipe produces a better powder that is still cheaper than the online Holi powder. I have seen corn starch as low as $2 a pound. So how do you make it? Read on!

If you are going to do this for a shoot, start making the powder several days in advance, if not a week. First, buy some cheap cornstarch. It does not need to be a fancy name brand. Next, pour the cornstarch into a large bowl and slowly add water until you get oobleck. If you don’t know what this is, watch a video or two on this fun-to-play-with substance. Try not to add too much water because eventually you are going to dry the mixture out. Don’t fret, you cannot mess up by adding too much water, it will just require more time to dry. After you have the non-Newtonian mixture made, add color to it. You can use food coloring to color the mixture as much or as little as you wish. I personally use Wilton cake decorating colors because they tend to be more saturated and I have access to it for next to nothing. For photo shoots, I suggest more saturated colors overall so use more coloring than you think you’ll need but keep in mind this is completely a personal preference. When the powder is dispersed in the air, the color tends to appear less saturated simply because it is not as condensed. Put on some gloves and mix the color thoroughly into the mixture. It will take some time and effort as the substance is a little difficult to mix.
After you have the color you’re after, spread the mixture into a large shallow pan that allows the mixture to spread out as thin as possible. The thinner you can get it, the quicker it will dry out. On hot summer days, I simply leave the pan out in the sun until it dries. If the weather is bad or particularly humid, you can place the pan in an oven at a low temperature to dry it out as well. Periodically break up and crumble the mixture during the drying period. If you dry the mixture on a countertop or outside, it may take several days to completely dry depending on the size of your batch and the pan used for drying. If you find that the mixture clumps together when you attempt to periodically break it up, it is still too wet. After the mixture is completely dry, place small portions in a blender to further reduce the mixture into a fine powder. After you have your powder, bag it up in air tight (moisture proof) bags or containers until the shoot!
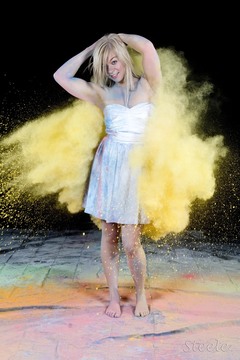
Please keep in mind that the color in the powder can stain! Make your model aware of this prior to the shoot so they can get appropriate clothing. Or as the photographer, purchase something for them to wear at a thrift store you don’t mind possibly ruining. As long as the model doesn’t get wet, or sweat too much, you can fairly easily blow the dust off of them. As soon as the powder gets wet, you do run the risk of it temporarily staining the skin or clothing. Frankly, we didn’t have that much of an issue with skin staining but it is something to consider. If at all possible, do the shoot outside or in an area you don’t mind getting powder all over the place. As you can image, cleanup can be a hassle. I have two powder shoots coming up, one with colored lights and one with colored powder. I will hopefully follow up with a tutorial on the actual shoots themselves discussing setup, camera settings, positioning of lighting, etc. Stay tuned!
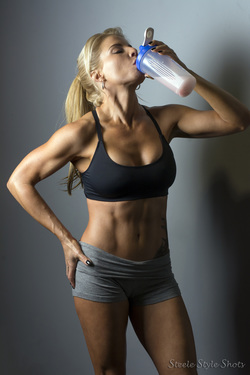 I always try and stay outside of my photographic comfort zone as much as possible and this latest fitness shoot is no exception. I have done a fitness shoot before but not nearly as involved and definitely not in an actual gym. In this blog, I will walk you through the shoot with examples on what went right as well as tips to look out for if you plan on doing a similar shoot. For those of you that know me personally, your first thought is probably one of concern. Me? Walking across the threshold into a gym? Yeah, I know. I had the same concern. I feared I would burst into flames or my camera bag would break open spilling out nothing but Twinkies. It’s very similar to the concern I have at the threshold of a church. Much to my surprise, I crossed the threshold without a single flame or puff of smoke. The model for the shoot is a friend I had met earlier in the summer at an outdoor sand volleyball tournament so we already had some familiarity with one another. I had originally approached her to be a model for a triptych image (which I will probably still do with her if she is willing) and she suggested a fitness shoot as well. She knows the owner of a gym and we scheduled the shoot when the gym was closed to the public. If you can get access to a gym after hours, I would highly recommend it. 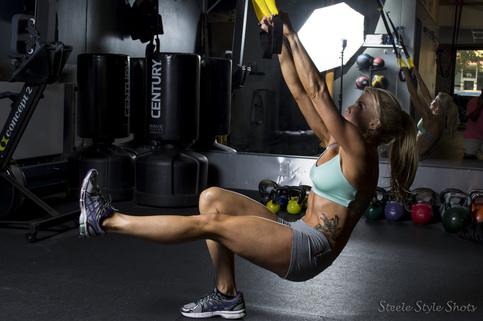 There are two basic ways to do a fitness shoot. You can use natural light or use flash/strobes. After trying both in the beginning, I found I preferred using off camera flash over natural light for one very important reason, SHADOWS! A fitness shoot is about accentuating muscles and the best way to achieve that is with dramatic high contrast lighting. Unless you are doing your shoot right by a large open window, it is very difficult to control natural light enough to create great contrast. As with any shoot that I do, I researched lighting specifically for a fitness shoot. Some sources suggested soft boxes whereas others suggested large reflective or even shoot-through umbrellas. I started with soft boxes but preferred the more direct and harsher light from a reflective umbrella simply because the light was more ‘contrasty’. However, be very aware of your background(s) as there are mirrors everywhere in a gym. I love how the model is lit in this image but I captured my entire umbrella (and myself as well) in the mirror in the background. No bueno. It's also not a good idea to have shadows falling on your model's face. Multiple light sources (or even a well placed reflector) can be used for rim or back-lighting but I wanted to keep the shoot as simple as possible. I did use multiple lights later in the shoot simply because I had them available. 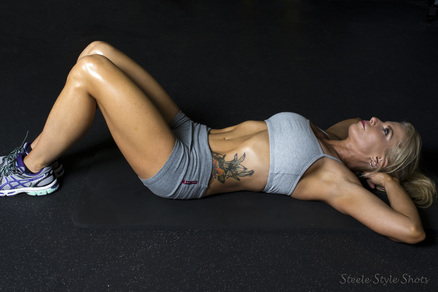 Another trick many photographers use for fitness photography is the use of baby oil. Having your model rub down all exposed skin with a very thin layer of baby oil will give the skin a glow that really helps the muscles pop out in the images. Be careful not to use too much oil in any one area. In this shot, you can see that the oil was applied heavier around the knees than the rest of her legs. The amount of shine just above her tattoo is perfect. This was completely my fault. She had asked if she had applied the oil correctly and I simply forgot to check the images to see if there were any areas being blown out because of too much oil. Simply towel off areas where the oil may be on too thick. Obviously it can be corrected in post, but I want to share an example of what to watch out for when using oil. I would still rather fix areas in post than not use the oil at all. It does make a huge difference. This trick is also helpful in boudoir/lingerie photography as well. 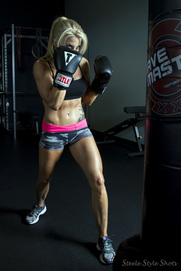 A fitness shoot is not about glamour and glitz. It is all about gritty, sweaty, exertion of energy. That being said, I wanted to get her entire body in focus. For the most part, I stayed around F8 to get a good depth of field on her entire body. This small of an aperture obviously decreases the amount of light your lens will collect. You can compensate to some degree by increasing the power of your lights as well as increasing your ISO. With a crop sensor camera (Nikon D7100), I did eventually bump up my ISO to a little over 400 to get a good looking histogram. I typically do not like going over ISO 400 if I can keep from it (unless I'm doing astrophotography) but the ‘luminance’ noise reduction function in Adobe Camera Raw made me comfortable going higher than I probably normally would. 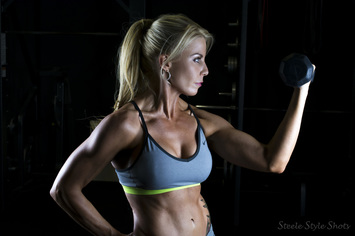 During the different exercises, I would watch to see where her muscles were most pronounced and would place a light about 45 degrees to the side of that area. I would then take the shot anywhere from 45 degrees to the light source up to almost the opposite side of the light source – almost to the point of getting some light glare in the lens (which happened on occasion). You want to get a good cross of both the lighted top portion of the muscle group as well as the deep shadows on the bottom or opposite side of the muscle group. You typically do not want to shoot from the same direction as the light as you will lose most of the shadowing effect. 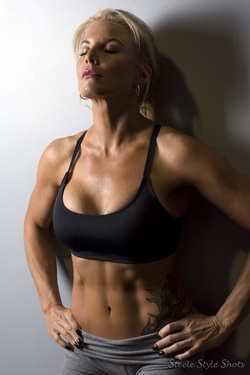 After finding good areas in the gym to shoot and having a good base for my camera settings, we moved from exercise to exercise trying to get the best images. Neither one of us had any time constraints so we could go at whatever pace worked best and with it being an empty gym, we didn’t have to worry about bothering anyone else. At the end of the shoot, we shifted gears from a workout theme to more of some basic portrait images, again trying to keep the muscles the focus of the images. For close up shots and a few portrait images, we simulated sweat with a spray bottle with one part glycerin to two parts water. The glycerin helps the water droplets keep their shape and stay in place as opposed to simply running down the skin. If you try this ‘sweat’ recipe, make sure your model is not allergic to glycerin (or baby oil for that matter). 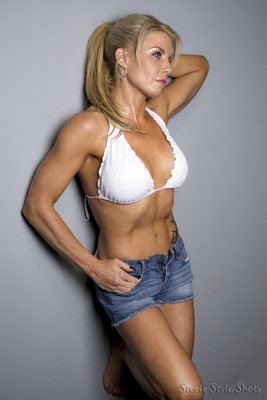 The shoot was a blast both taking pictures and in post processing! Having a model that is very down to earth, fun, and incredibly easy to work with makes all the difference. She was patient when I constantly needed to move my lights around and she would even suggest certain poses to highlight certain muscles. She came with several different wardrobe changes which helped keep the images looking fresh and new. In addition to getting the images she wanted for her own purposes, she made sure I got the images I wanted for my portfolio as well. If only every model were as easy to work with…. Post processing the images is almost the opposite of what I normally would do for portraits. Instead of softening the image by reducing clarity, I pushed the clarity up. Also, if you have never used dodge and burn tools in post processing, a fitness shoot is a perfect time to learn those tools. Dodging highlights and burning shadows will greatly help the muscles pop. I found myself dodging and burning less than I thought I was going to have to simply because of the great shape of the model. She had very well defined muscle groups making my job a lot easier. I am anxious to work with her again! Be it a powder, underwater, fitness, firewall, paint toss, or any other unusual shoot, stay out of your comfort zone! The more you push yourself the better you will become as a photographer. That’s not to say it’s a bad thing to specialize in an area or two, but I find photography more interesting, challenging, and fun when I am picking up my camera bag on my way out of the door thinking to myself, “I hope I can pull this off”. Do I now consider myself an expert fitness photographer? Ha! Not by a long shot. But should I attempt to do another similar shoot, I will be able to use my experiences to get even better images. For me, photography is about the process of learning and getting better over time and not necessarily about trying to get that 'perfect' image. You may get some images along the way that are absolutely stunning but that shouldn't be the end of the hobby or process. Keep learning and growing. Special thanks to my wonderful fitness model for donating her time and body. She may also be creating a fitness blog of her own and I will provide a link to her blog as soon as it becomes available.
I love well done levitation photography! The funny thing about levitation photography is that it is relatively easy to create. In this post, I will describe two common methods to achieve levitation and walk you through an example of exactly how I go about doing it. For those of you out there that suffer from ‘stop wasting my time and just get to it’ syndrome, please feel free to scroll down to the bottom and watch the instructional video on how I create levitation images. For those of you wanting a little more detailed information, read on!
Obviously levitation is impossible. There is no getting around the laws of gravity. So when someone sees a well done levitation image, it makes them stop and wonder how it was done. With a little research, it’s fairly easy to learn how to make someone, or something, look like it is levitating. The more complicated part is finding a composition that makes the entire image more interesting that just a person in mid-air. A good levitation image should attempt to tell a story.
Equipment for basic levitation photography consists of just a camera, that’s it. Sometimes a tripod can be useful but not necessary. Equipment for more advanced levitation consists of a camera, a tripod, and some type of photo editing software that will allow you to combine images. You do not have to have the latest and greatest software to get stunning results. I use Photoshop CS4 but any decent image editing software will work just as well.
The first method in creating a levitation image is to simply get a picture of someone in mid-air. Taking a picture of them as they jump is a good example. You can also attempt to get a picture of them falling forward or backward. This can sometimes be a little challenging as you may need to repeat the process until you get the perfect image. Timing is everything when using this method. You will most likely get some images that were taken just a tad too late and others taken just a tad too soon. You also want to make sure your shutter speed is fast enough to freeze the action. The floating object should be as sharp as possible for a convincing levitation image. Blurred edges on the floating object will make it look like you simply took a picture of the object or person falling which is not that convincing. Poses can be hard to get perfect as well. Benefits of this method are that it is simple and straight forward, does not require any additional equipment, and requires little to no post processing. One of the drawbacks is that the images may not be as convincing as some of the images that you can create with the second method. 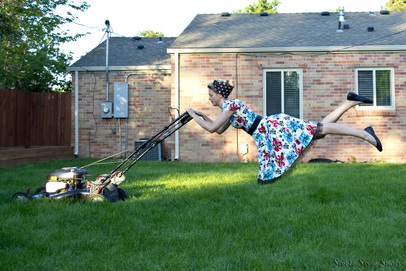
The second method in creating a levitation image requires more equipment and time but can sometimes yield more convincing results. For this method, you will need at least two images. One image will be of your subject resting on some object and the second image will be the same scene with no subject or object in the picture. You then combine certain parts of both images to create a new single image. The best way to do this is to have your camera set on a tripod focused on a certain area. Make sure your camera is set in manual mode and DO NOT move the camera once it is set up and ready to go. If your camera is in automatic mode, the focus may shift, the aperture may change, the ISO may change, or your shutter speed may fluctuate between images as well. You do not want this to happen as one image may be lighter or darker than the other image making the process of blending multiple images together more difficult, but not impossible. The benefit of this method is more realistic and creative images. Drawbacks of this method include the additional required equipment and the time required to edit the images in post.
I typically take a picture of the subject resting on an object first followed by the second photo with nothing in the scene. There is no real reason for doing this other than it reminds me to take that second shot before moving my camera. If you are doing this outside, make sure the images are taken relatively close in time as the changing angle of the sun can change the lighting of the scene. Although not absolutely necessary, I like to have my model wear clothing that drapes quite a bit. This helps to both cover up the object they are resting on and the draping fabric adds to the illusion that they are actually defying gravity. Other ways to increase the effect include dangling jewelry, hair down, etc. Once you have at least those two images, it is time to combine them in an editing program. 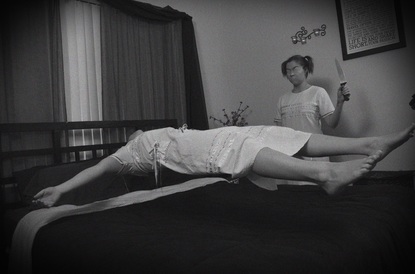
Again, I use Photoshop CS4 but any editing program that will allow you to stack images together and create different layers will work. Open both of your images. In Photoshop, I place the image with the person resting on the object in a layer above the empty image and erase parts of the top image (levitating person) revealing the empty image below. If your camera was on a tripod, the images should match up perfectly. If you kept the camera in manual mode, the brightness, contrast, and color should be identical between the images as well. After removing the object used to rest on, touch up the photo as normal and combine (flatten or merge) the images together into one image. If you are working with an image where the levitating person or object casts a shadow on the ground, you can add that shadow back into the image making the image look very realistic. There are several ways to do this and I plan on having a tutorial on this topic in the future. The video for this post does go into a little detail on how to create a very simple shadow underneath an object.
If you are more of a visual learner like myself, the following video will walk you through the process described above in creating a levitation image. If you have never tried it before and want to give it a shot, I would love to see your results. If you have done several levitation photos before, I would love to see your best picture. Either way, get your camera out and try something new and different – something outside of your comfort zone. And don’t be afraid to mess up. It’s just a reusable memory card!
We are just a few weeks away from an American tradition of celebrating our nation’s independence by blowing up a small part of it! Yup, the 4th of July! And nothing says independence better than setting off a slew of explosives. For several years now municipalities have had their own fireworks shows for local residence. Nowadays, you can find a fireworks show nearly everywhere in the city on the 4th of July. This is a perfect time to grab your camera and try some night time long exposure photography! 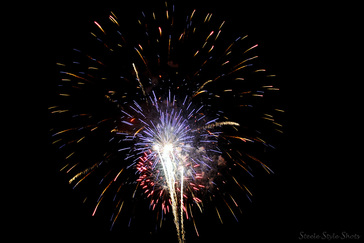 Equipment for fireworks photography is fairly simple. All you really need is a camera with the ability to extend the shutter length and a tripod. I typically also take along my remote wireless shutter release just to make sure I’m not shaking the camera when I take a picture. Make sure you are familiar with your camera and can quickly and easily change settings in a completely dark environment. The last thing you want to do is miss the show because you’re hunting around your camera trying to change settings. 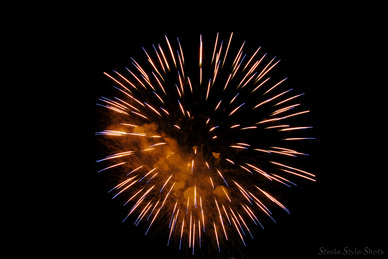 In addition to a DSLR, I usually take a lens that has a moderately wide angle view. Most of the time my focal length is somewhere around 35mm, sometimes a little wider, sometimes a little narrower. The typical kit lens (18-55mm) is a good choice. I typically shoot fireworks in manual mode as I don’t want the camera attempting to get a perfect exposure. It will constantly attempt to make the image much brighter than it should be. Aperture setting is a little more complicated and may take a little experimenting. You want to get a good depth of field so a mid-range F-stop number is desired (F5 to F8) but you don’t want to decrease your light gathering abilities by setting it too high (such as F11+). I typically shoot around F5. I have tried a very fast lens at F2.8 but found the shallow depth of field an issue when trying to keep the entire image sharp. Plus, keep in mind you are only trying to capture the light from the fireworks and not necessarily the ambient light of the sky. I keep my ISO set to the lowest my camera will accommodate, usually ISO 50 or 100. Again, I want a dark background – black if possible. 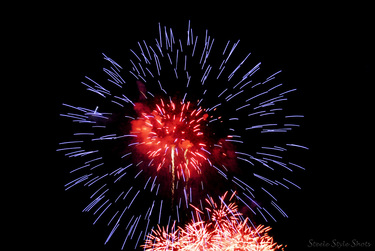 The last setting to consider is your shutter speed. This is where a sturdy tripod is a necessity. Your shutter will be open for a significant time so hand holding your camera typically will introduce severe blurring. Experiment with different settings. A longer shutter will give more firework trails and can create some fairly interesting pictures. Shorter exposures will give more of an ‘explosion’ effect to the pictures. If you prefer the longer, softer looking images, increase your shutter speed. Keep in mind that doing so may lighten your picture more than you want. To compensate, increase your F-stop number to a higher value (from F5 to somewhere around F8 perhaps). Take a few shots and see which images you like best. I typically like the images I get at between .5 to 2 seconds. I get a little trailing but not so much that the ‘explosion’ effect is lost. Once you get the desired images you want, start shooting away. 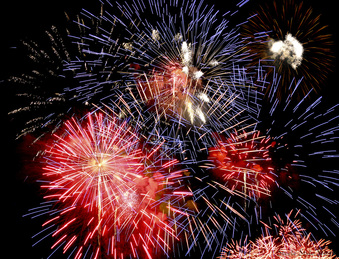 I simply start watching the sky and press the remote button after each shot or when I think there is about to be a good display. A decent fireworks display can yield you more images than you probably anticipate. Make sure you have a good sized memory card and charged up batteries. Another piece of advice, turn off your camera’s long exposure noise reduction feature if your camera has one. This feature will attempt to reduce noise from a long exposure image. Typically this is a good thing but it takes about as long as capturing the image as it does to process and remove any noise. You will miss several good shots waiting for the camera to process each image. Besides, a 2 second exposure typically isn’t long enough to introduce the type of noise the feature is designed to remove. 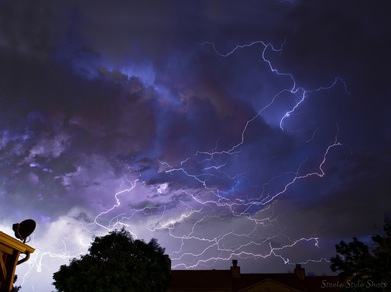 This technique is also the same technique I use to capture nature’s fireworks – LIGHTNING! The only differences are that I continuously snap away with lightning as I never know when the next strike is about to happen, and I will typically shoot with a wider field of view to get more of the sky in the frame. Otherwise, the settings are just about the same. I do tend to keep the shutter speed closer to 2 to 4 seconds as well. Unlike fireworks displays, lightning takes a little more patience. You may take close to 100 pictures to later find you only really got a handful of great lightning strikes. Because of this, I will typically stack the images of the more impressive strikes into one image. Here again, using a tripod is crucial. If the storm is close, you will have a limited time to get the pictures before the heavens open up and the rain begins to fall. Be safe though! You’re more likely to be struck by lightning than to win the lottery. Don’t be a statistic that corroborates this saying. Be it a lightning show or a fireworks display, take the opportunity to get your camera out and experiment. With so many different displays around town on the 4th, and some even a day or two before the 4th, try different settings for different fireworks displays. You don’t even really need a professional display to experiment. Try it when the kids are out setting their fireworks off in the street or in the yard. Year after year I would set up at a local display and capture image after image of great exploding fireworks. It’s relatively easy and I think you will be amazed at some of the images you will capture. In the end, simply have fun with your camera trying something new. See you out there!
|
SteeleKeep the interesting parts of life in focus. Archives
November 2020
Categories
All
|
 RSS Feed
