|
I have always had a fascination with light painting and photography. Some of the images I have seen online simply blow me away. Hopefully after reading this blog and watching the video, you too will be inspired to take a stab at this incredibly creative art form.
Light Painting with Steel Wool
Steel wool is cheap, can be found at just about any hardware store, and makes for some incredible light painting images. When purchasing steel wool, make sure you get steel wool with a very fine texture or grade. I get steel wool with a grade of #0000. Although you tend to get more sparks from this grade, experiment around with other grades as they can give you different effects. Find a metal container to hold the steel wool as it melts (burns) away. A metal whisk works out perfectly. I was lucky enough to find metal whisks with a metal loop at the end of the handle. Next, find something to attach to the whisk that will allow you to spin the whisk around. I used a short length of chain and a quick connector. Once you are set up and ready to go, take a pad of steel wool, fluff it out a bit, and place it inside of the whisk. Light the steel wool with a match, lighter, or even a 9 volt battery. After lighting the steel wool, swing it around. The faster you swing it, the further the sparks will fly! A friend of mine swung the steel wool while I manned the camera in the video and images. A word of caution: you are working with molten metal. Keep this in mind. Do this in an area where the risk of setting the surrounding area on fire is minimal. If using a model, be extremely cautious. These sparks can, and will, burn you! And as I learned on this shoot, it’s not a bad idea to have a fire extinguisher handy as well.
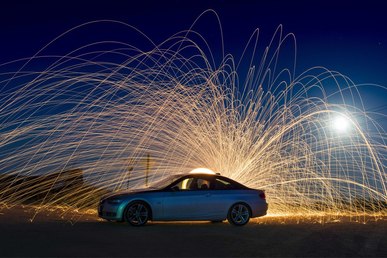
Camera settings. All you need is a camera that is capable of long exposures (with bulb mode if possible) and a steady tripod. In this case, we parked the car in front of a small puddle to get a reflection. My camera was set approximately 30 feet in front of the car. Since we did this shoot at night, I used a powerful flashlight to illuminate the model and car enough to be able to lock focus. Once I had focus locked, I switched to manual focus so that the camera did not hunt for focus before each shot (which it probably would have never found). I was using my Tamron 24-70mm on a crop sensor camera (D7100) closer to the 24 mm end of the lens. I set my ISO to its lowest, 100, and set my f-stop to f/9 but feel free to play around with your settings. We had a bright full moon out that night which provided additional light. I set my camera to bulb mode and began the exposure as soon as the sparks started to fly and ended the exposure as soon as they died off. Each shot was different but if I had to guess, the average shutter length was around 15 to 20 seconds long and bulb mode allowed me to start and stop exactly when I wanted.

The first couple of attempts were nice but the car remained in shadow, more or less. In an attempt to light up the front side of the vehicle facing the camera, I placed two flashes on the ground aimed at the model and vehicle. I set the flashes to rear curtain so they went off at the end of the exposure, that way, the person twirling the steel wool and the model knew exactly when the exposure was complete. Both flashes were set to ½ power. If I do a shoot like this again, I will put colored gels over the speed lights to get a better match in color on the car and model as compared to the sparks and the background color in general. I did adjust the hue and color balance on the car slightly in post, but getting it right in camera is always the better practice.
Light Painting with Fire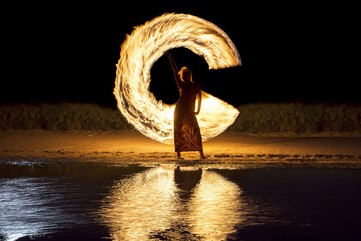
I got this idea from Zach Alan of Zach Alan Photography. The principle is very similar to the steel wool idea (or any light painting idea). You simply paint with fire behind your model. I used a ¾” wooden dowel that was 48” long. I then wrapped cotton around the top foot and a half of the dowel and secured the fabric in place with industrial staples. I also think wrapping the top portion of the dowel with natural fiber rope (like in my firewall tutorial) would work just as well. I then soaked the cotton in Coleman fuel (white gas) and lit on fire. We got decent light from the fire for about one minute then it started to slowly burn off and die out. Simply smother out the remaining fire with a damp towel and re-soak for more images. Make sure the fire and sparks are COMPLETELY out before pouring more gas on it. Since I was the individual light painting with the fire, I had my camera set to a two second exposure and had another individual trigger my camera. Some of the resulting images I had to edit and fix in post either because the camera stopped too soon or too late. In the future I think I will try triggering the shutter with radio triggers so I can precisely control when the camera starts and stops. I think this should be possible even while being the one light painting.
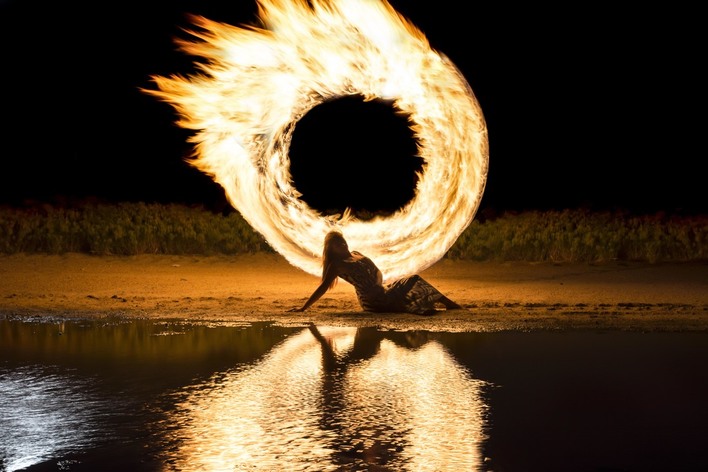
Camera settings – other than bulb mode, the settings were exactly the same. We did not use the flashes for the images with just the model.
Overall I am pleased with the results but would do things a little differently for both ideas should I revisit them in the future (which I most definitely will). Anyway, get out there and try some light painting with steel wool and fire, but be safe! No image is worth a visit by the local fire department or a trip to the emergency room! Well, most images, at least.
0 Comments
|
SteeleKeep the interesting parts of life in focus. Archives
November 2020
Categories
All
|
 RSS Feed
